

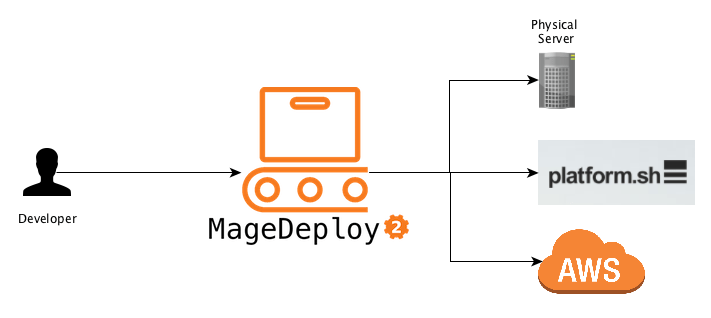
In our recent post series about Deploying Magento2 using Jenkins and deployer I was showing you how our Deployments are set up.
In case you haven’t read them and are interested in the details here are the links:
- History and Overview of Magento2 Deployment
- Jenkins Build-Pipeline Setup (building assets, controlling the deployment)
- Releasing to Production (delivering code and assets, managing releases)
- Future Prospect (cloud deployment, artifacts)
During the time of writing those articles I realized quite some improvements and generalizations that could be done to make this deployment more maintainable, extensible and customizable. I wanted to have a deployment setup that allows local execution with colored output, execution on a build server without interaction and usage in a build pipeline.
Furthermore I wanted the deployment setup not only to be usable within netz98 but also by the whole Magento community.
What I came up with I called MageDeploy2 which I will introduce with this post.

If you read the previous post you will probably remember the diagrams showing the actions executed on the particular servers. I used one of those to mark the areas which will be provided by the MageDeploy2 setup.
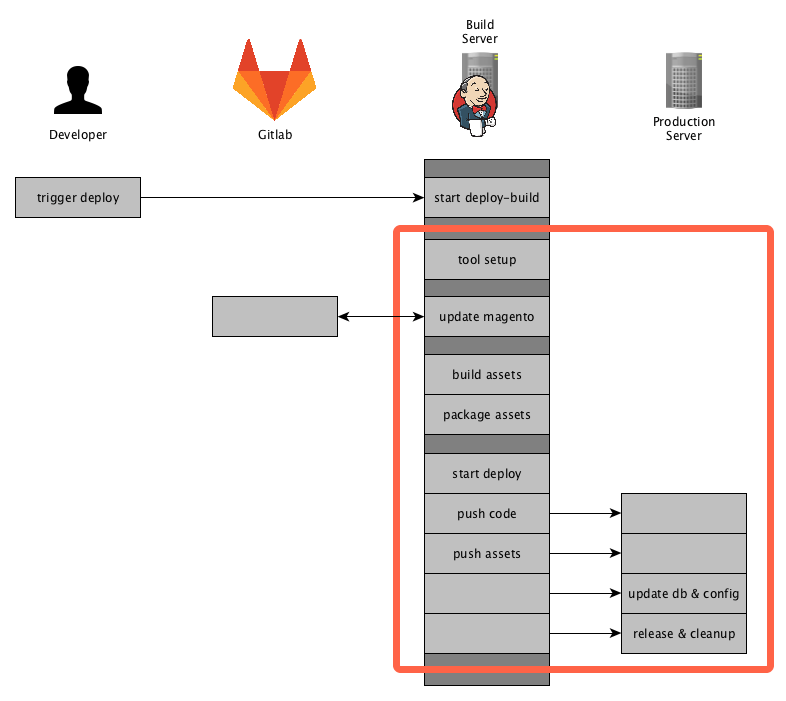

Now let’s go into details on how those phases and steps are implemented and what you need to get started with a PUSH deployment for Magento2 yourself.
About MageDeploy2
MageDeploy2 combine’s multiple technologies and open-source projects to provide the deployment setup.
It basically is a set of tools, configurations files, some custom tasks for Robo and Deployer, all tailored to fit the needs of deploying a Magento2 project.
For those new to Robo and Deployer:
- Robo is a task runner that allows you to write fully customizable tasks in common OOP PHP style http://robo.li/
- Deployer is Deployment tool for php, which follows a approach similar to capistrano https://deployer.org/
I will not go into to much detail on how those tools work, you can get that from their designated websites and documentation.
MageDeploy2 can be divided into 3 phases that can each be triggered separately.
- magento-setup (preparing a local magento-setup)
- artifacts-generate (generating the assets and packaging them)
- deploy (release to production environment)
Those phases are implemented as commands in the RoboFile.
MageDeploy2 is divided into different packages that are installed when installing through composer.
- mwltr/robo-deployer : contains Robo-Tasks for deployer
- mwltr/robo-magento2 : contains Magento2 specific Robot-Tasks
Those Robo-Tasks are not a full set of all possible commands and options but currently offer the commands and modifiers needed in deployment scenario. They are decoupled and can be re-used in other projects.
As far as the deployer setup is concerned, MageDeploy2 uses n98/n98-deployer to include deployer configurations and tasks, them being:
- set of Magento2 specific tasks
- Magento2 Default Recipe
- RoleManager for servers
- optimized deployer standard tasks
Requirements
As I mentioned earlier, Magento2 Deployment Setup is using Robo to control the local setup and the overall deployment process. To achieve the actual deployment to the distinct environment it comes with a pre-configured Deployer setup. Please note that using Deployer is not mandatory, you can use whatever tool you like.
It also expects that you have a git repository available, where you have commited your Magento2 composer.json file in either the root or in a sub-directory. Right now we are only supporting git but it should not be that big of a problem to connect to another VCS.
Finally you need to have configured the access to the Magento composer repository for your current user.
Create a new Deployment
To Create a new deployment setup just run the following command.
composer create-project mwltr/magedeploy2-base <dir>
Note: Robo needs to be installed using composer, otherwise the usage of custom Tasks is not available. See the Robo Documentation Including Additional Tasks
Configuration
After the Installation you have to edit the magedeploy2.php and the deploy.php file to suit your needs. MageDeploy2 assumes you have a git repository containing the magento composer.json. Furthermore your local build environment can clone said repository and download the Magento packages using composer.
MageDeploy2 Configuration
To configure the MageDeploy2 use the following command:
./vendor/bin/robo config:initIt will guide you throught the most important configuration options. Don’t worry you can edit the magedeploy2.php later-on.
Next, run
./vendor/bin/robo validateto validate your build environment is setup.
Setup local build environment
If you are done with the configuration in magedeploy2.php, you can see if your build environment can be setup. To do so run this command:
./vendor/bin/robo deploy:magento-setup developYou can use a different branch or tag depending on your git repository setup.
After the magento-setup has run successfully, you can now generate the assets by running the command:
./vendor/bin/robo deploy:artifacts-generateAfter this command is complete you should see the packages beneath shop.
At this point we are sure that the local build setup is working and we can now continue with releasing our project.
Deployer Configuration
To evaluate we will create a local deployment target. To do so copy the local.php.dist by runing
cp config/local.php.dist config/local.phpand set the config values according to your local deploy target.
Check the configuration in deploy.php and adjust it to your requirements. The default configurations and tasks are defined in \N98\Deployer\Recipe\Magento2Recipe. You can also have a look at all the configurations available in the Deployer Documentation
Setting up deploy directory tree
After you are done with setting the configuration, you can now initialize the directory tree of the deploy target run
./vendor/bin/dep deploy:prepare localThis will create the required directories on your local deploy target.
Setting up deploy target (optional)
If you want to set up your deploy target as well you can use the command
./vendor/bin/dep server:setup localIt will make an initial deployment to push your code to the deploy target.
When this is done navigate to your local deploy_path and run the magento install command to setup the database. This might look something like this:
cd <deploy_path>
php bin/magento setup:install --db-host=127.0.0.1 --db-name=magedeploy2_dev_test_1_server --db-user=root --admin-email=admin@mwltr.de
--admin-firstname=Admin --admin-lastname=Admin --admin-password=admin123 --admin-user=admin
--backend-frontname=admin --base-url=http://magedeploy2_dev --base-url-secure=https://magedeploy2_dev
--currency=EUR --language=en_US --session-save=files --timezone=Europe/Berlin --use-rewrites=1
Now we have Magento database and configuration on our deploy target and are ready to continue with the final step.
Deploying the project
At this point, you have setup the build environment and target environment and can finally start with the actual deployment. You can do so by running:
./vendor/bin/dep deploy localCongrats you have successfully setup your deployment pipeline and run the first deployment!
Commands
If you went through the tutorial above, you may have already used most of them.
A full list of commands is available in the github repository here:
https://github.com/mwr/magedeploy2-base#commands
The following diagram shows the commands responsibility within the deployment pipeline.

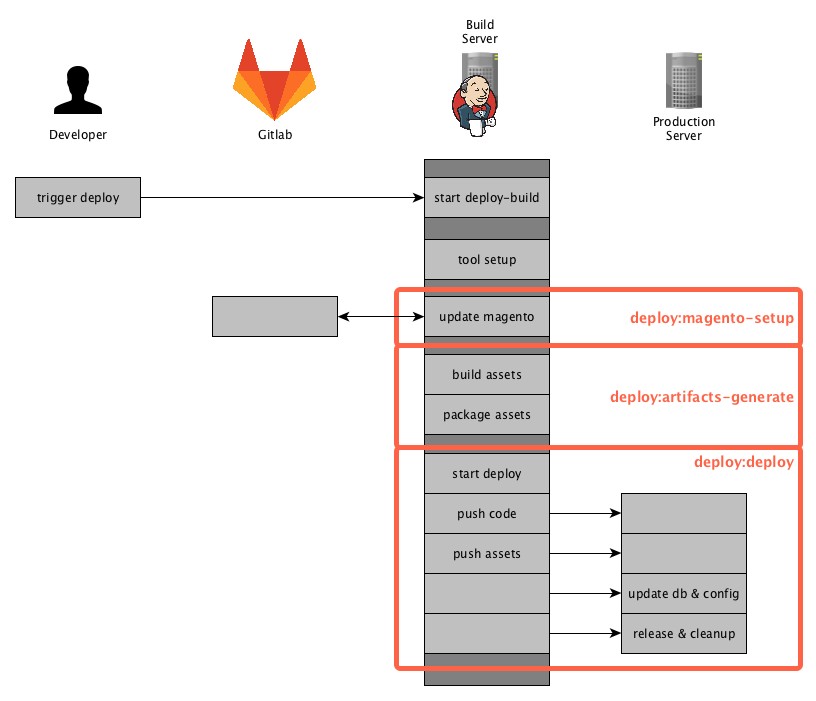
deploy:magento-setup
Runs all tasks in the stage magento-setup. It will setup or update a local Magento instance by pulling the source-code from git, installing composer dependencies and installing or updating a local database.
deploy:artifacts-generate
Runs the Magento di:compile and setup:static-content-deploy commands to generate the assets. It is using your configuration from the magedeploy2.php.
After generating those assets it will create packages, again according to your configuration.
deploy:deploy
This command will invoke deployer to release your project and push the prepared artifacts to the server.
deploy
Triggers the deployment with all it’s stages and can be considered to run deploy:magento-setup, deploy:artifacts-generate and deploy:deploy internally.
Customization
MageDeploy2 was designed to be highly customizable to suite your needs. Here are some areas that are easy to adjust:
- Add or overwrite Robo-Tasks
- Add or overwrite existing or additional configuration to MageDeploy2
- Customize Deployer but still have the basic set of tasks available
- Exchange deployer with a different tool
The go into details here would exceed the purpose of this introduction. We may go into details in this area in a later post though.
Final Words
This is it, I hope you like the tool and it will be helpful setting up a PUSH deployment of your own.
And as always let me know your thoughts and feedback in the comments below or contact me directly.


Magento1 since 2008 / Magento2 since 2015
Passionate Road Bike Rider (~3.500km/yr)
Loves building software with a elaborate architecture and design
3x Magento Certified
Software Developer >10 years
Head of Magento Development @ netz98