This post is part of series:
Recap
In the last post Jenkins Build-Pipeline Setup we had a look at our Jenkins Build-Pipeline and how to the setup and configuration is done. If you haven’t read it yet you should probably do so before reading this post.
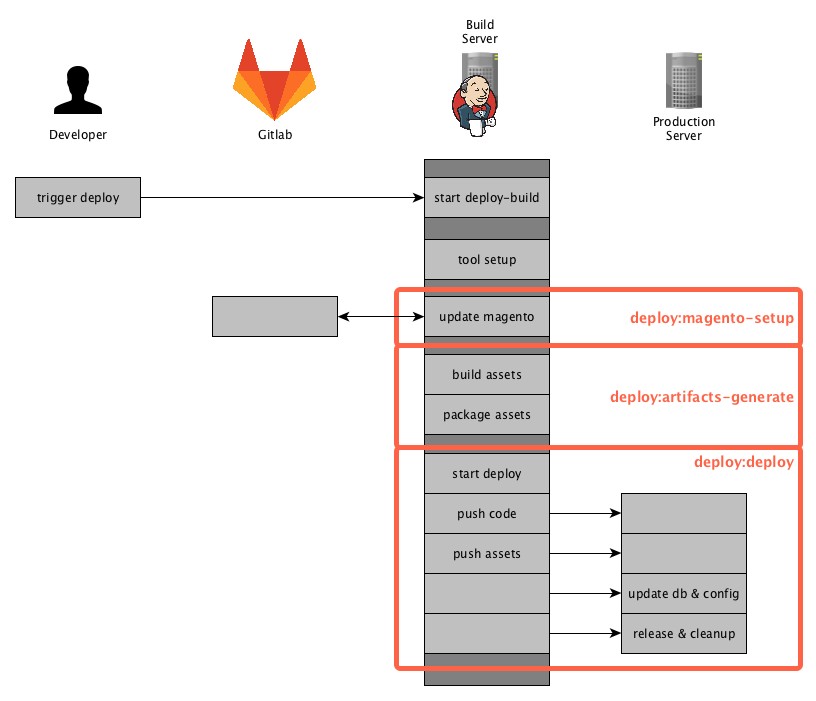
The last step in our Build-Pipeline was the actual Deployment which can be defined like this:
stage 'Deployment'
if (DEPLOY == 'true') {
sh "./dep deploy --tag=${TAG} ${STAGE}"
}
You may notice the missing sshagent call compared to the previous post. This sshagent call results from one of our older deployment setups where we were still pulling code from the server. After writing the post about our Build-Pipeline setup I questioned that, and as it turns out we don’t need that anymore and can simplify our Deployments. This part was actually not so trivial to setup if you don’t know exactly what to do and what to look for, so I am happy to scratch that complexity.
In this post we will dive into the actual Deployment and Rollout of your Magento2 application.
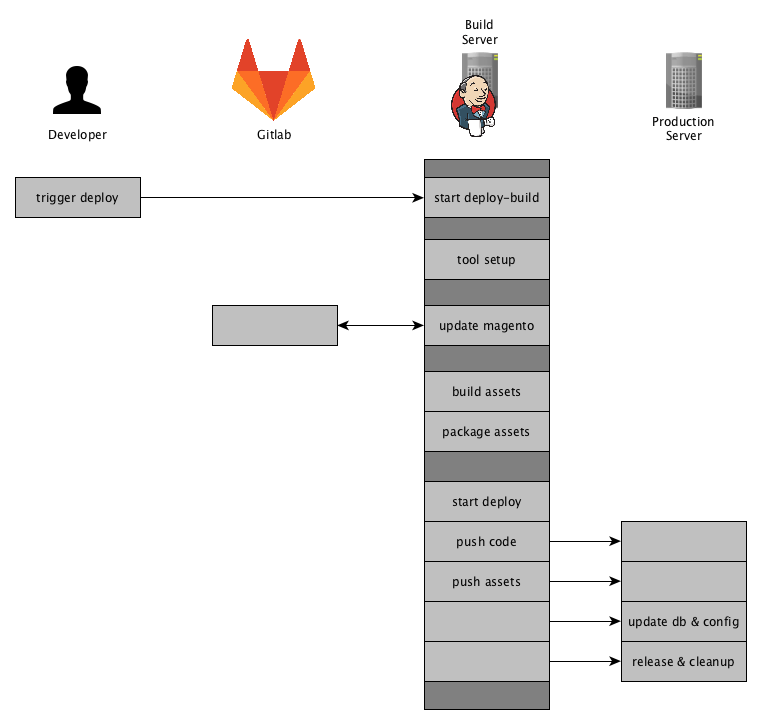
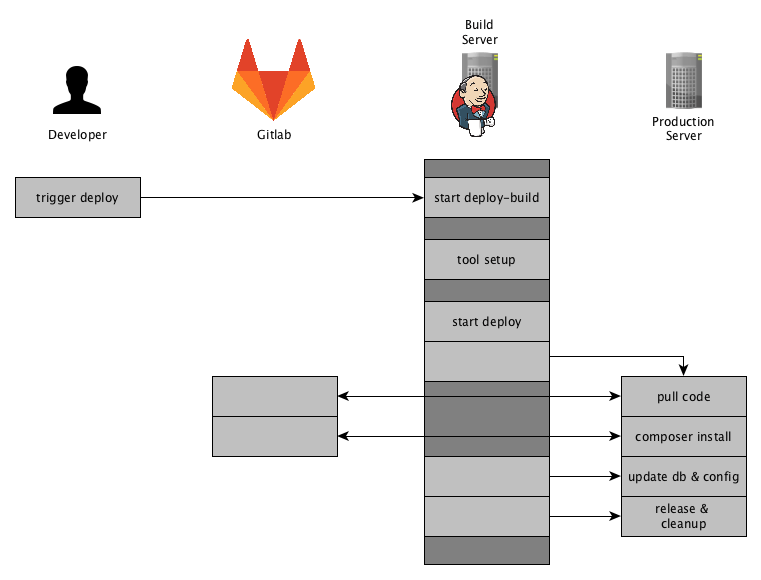
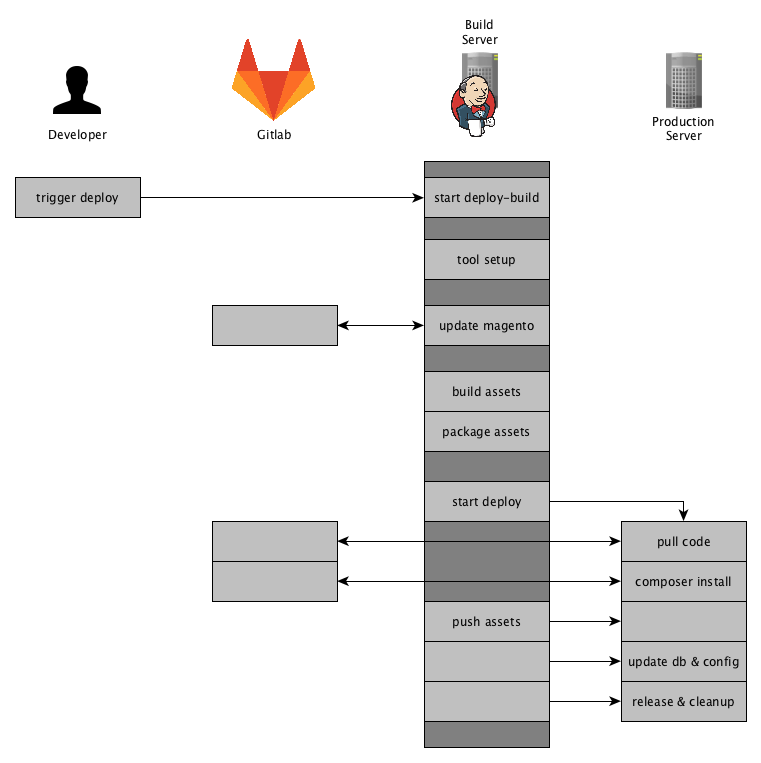
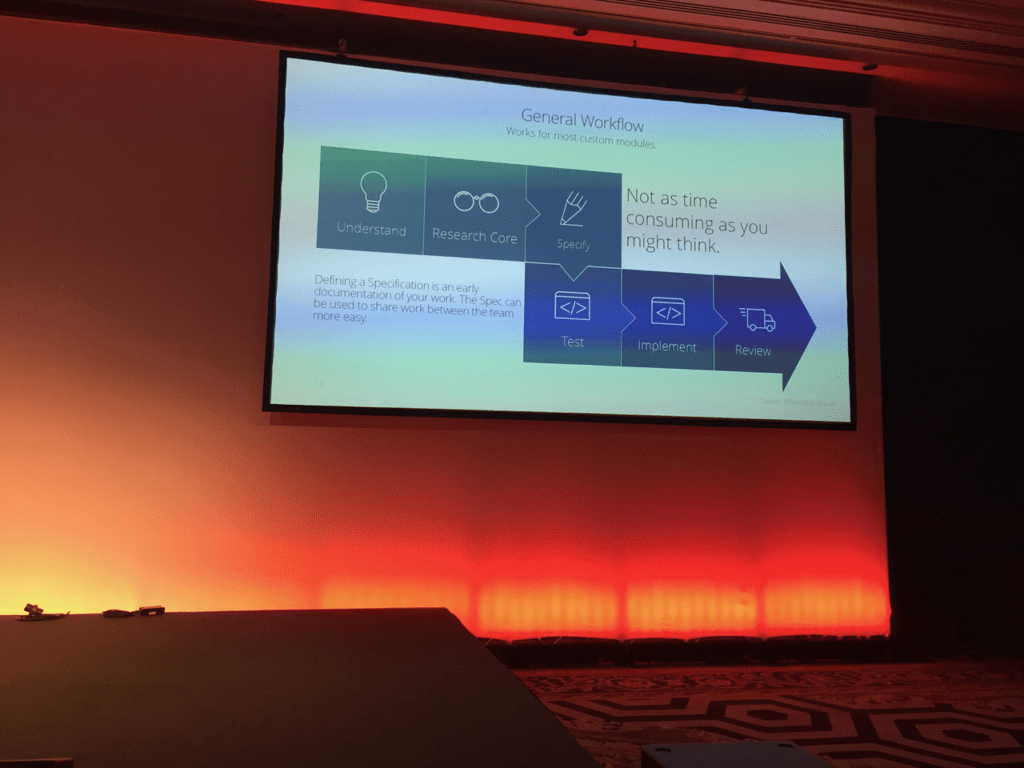
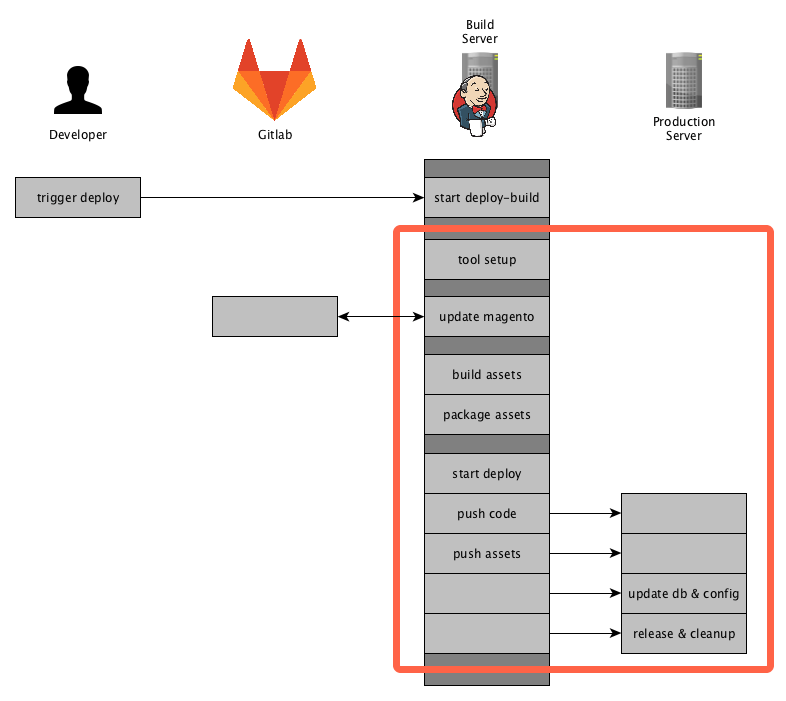
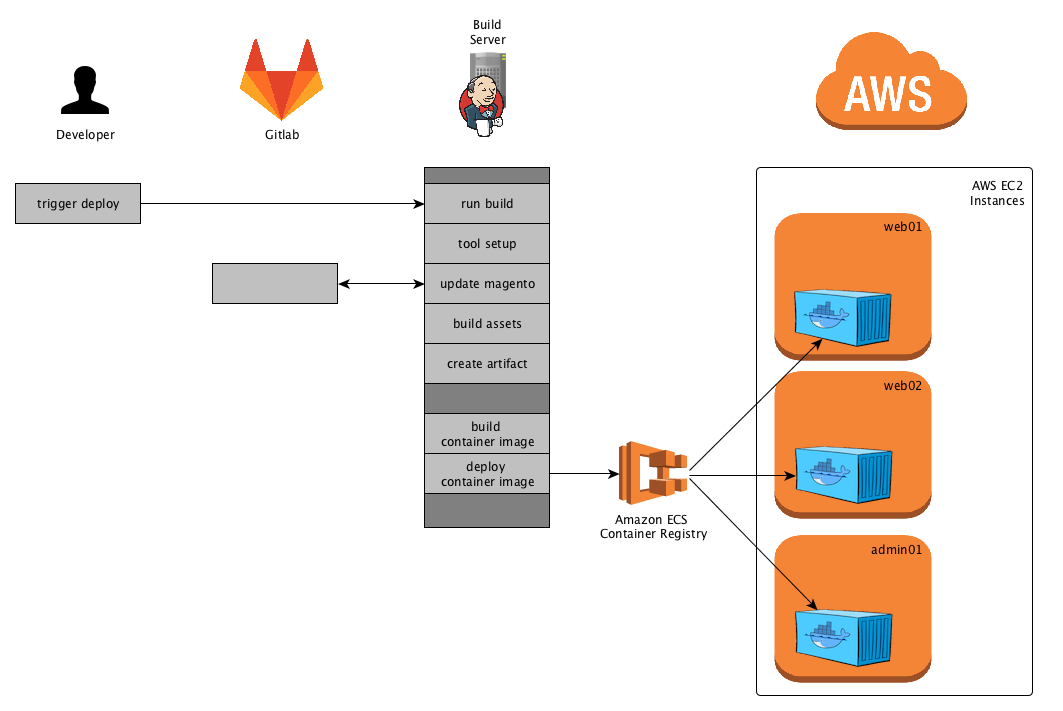
Remembering the visualization of your Deployment Process, we are now enter the last action-block. I have marked the part we are going to elaborate accordingly.

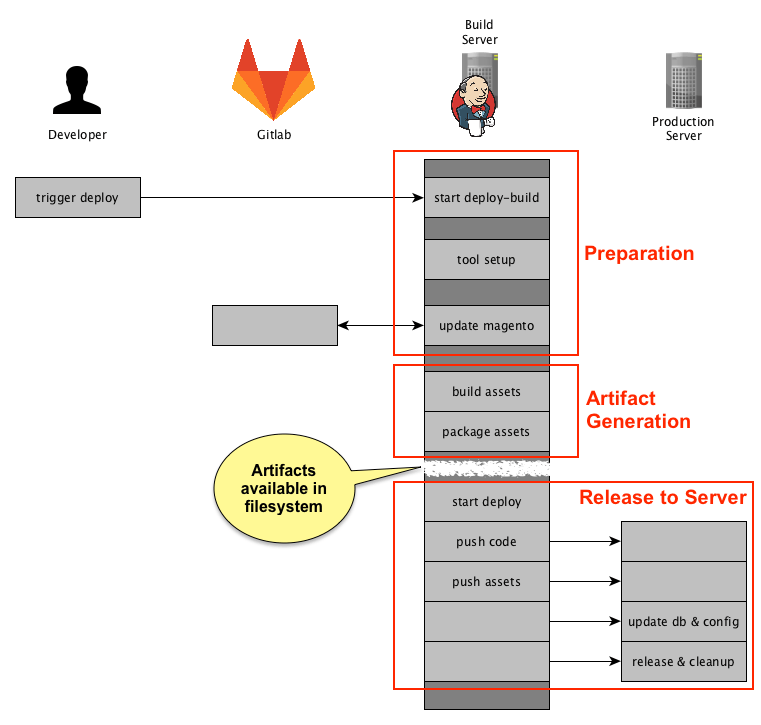
Prerequisites
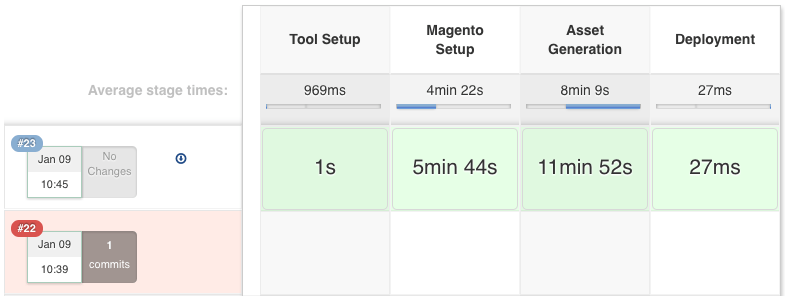
In the stage ‘Asset Generation’ we build all the necessary assets and created tar.gz files for them.
Thus before starting stage ‘Deployment’ we have the following files available in the workspace of our Jenkins Build.
config.tar.gz
var_di.tar.gz
var_generation.tar.gz
pub_static.tar.gz
shop.tar.gz
Next up, those files will be used to build the release on the remote server.
Starting the Deploy
As mentioned in the last post we are using Deployer here to handle the release to staging or production environments.
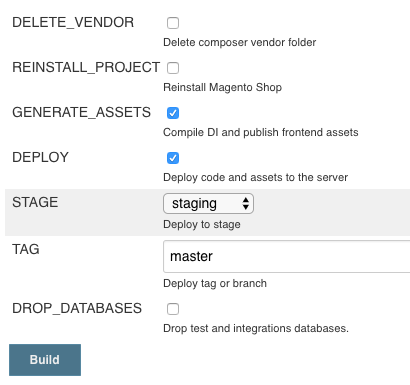
./dep deploy --tag=${TAG} ${STAGE}
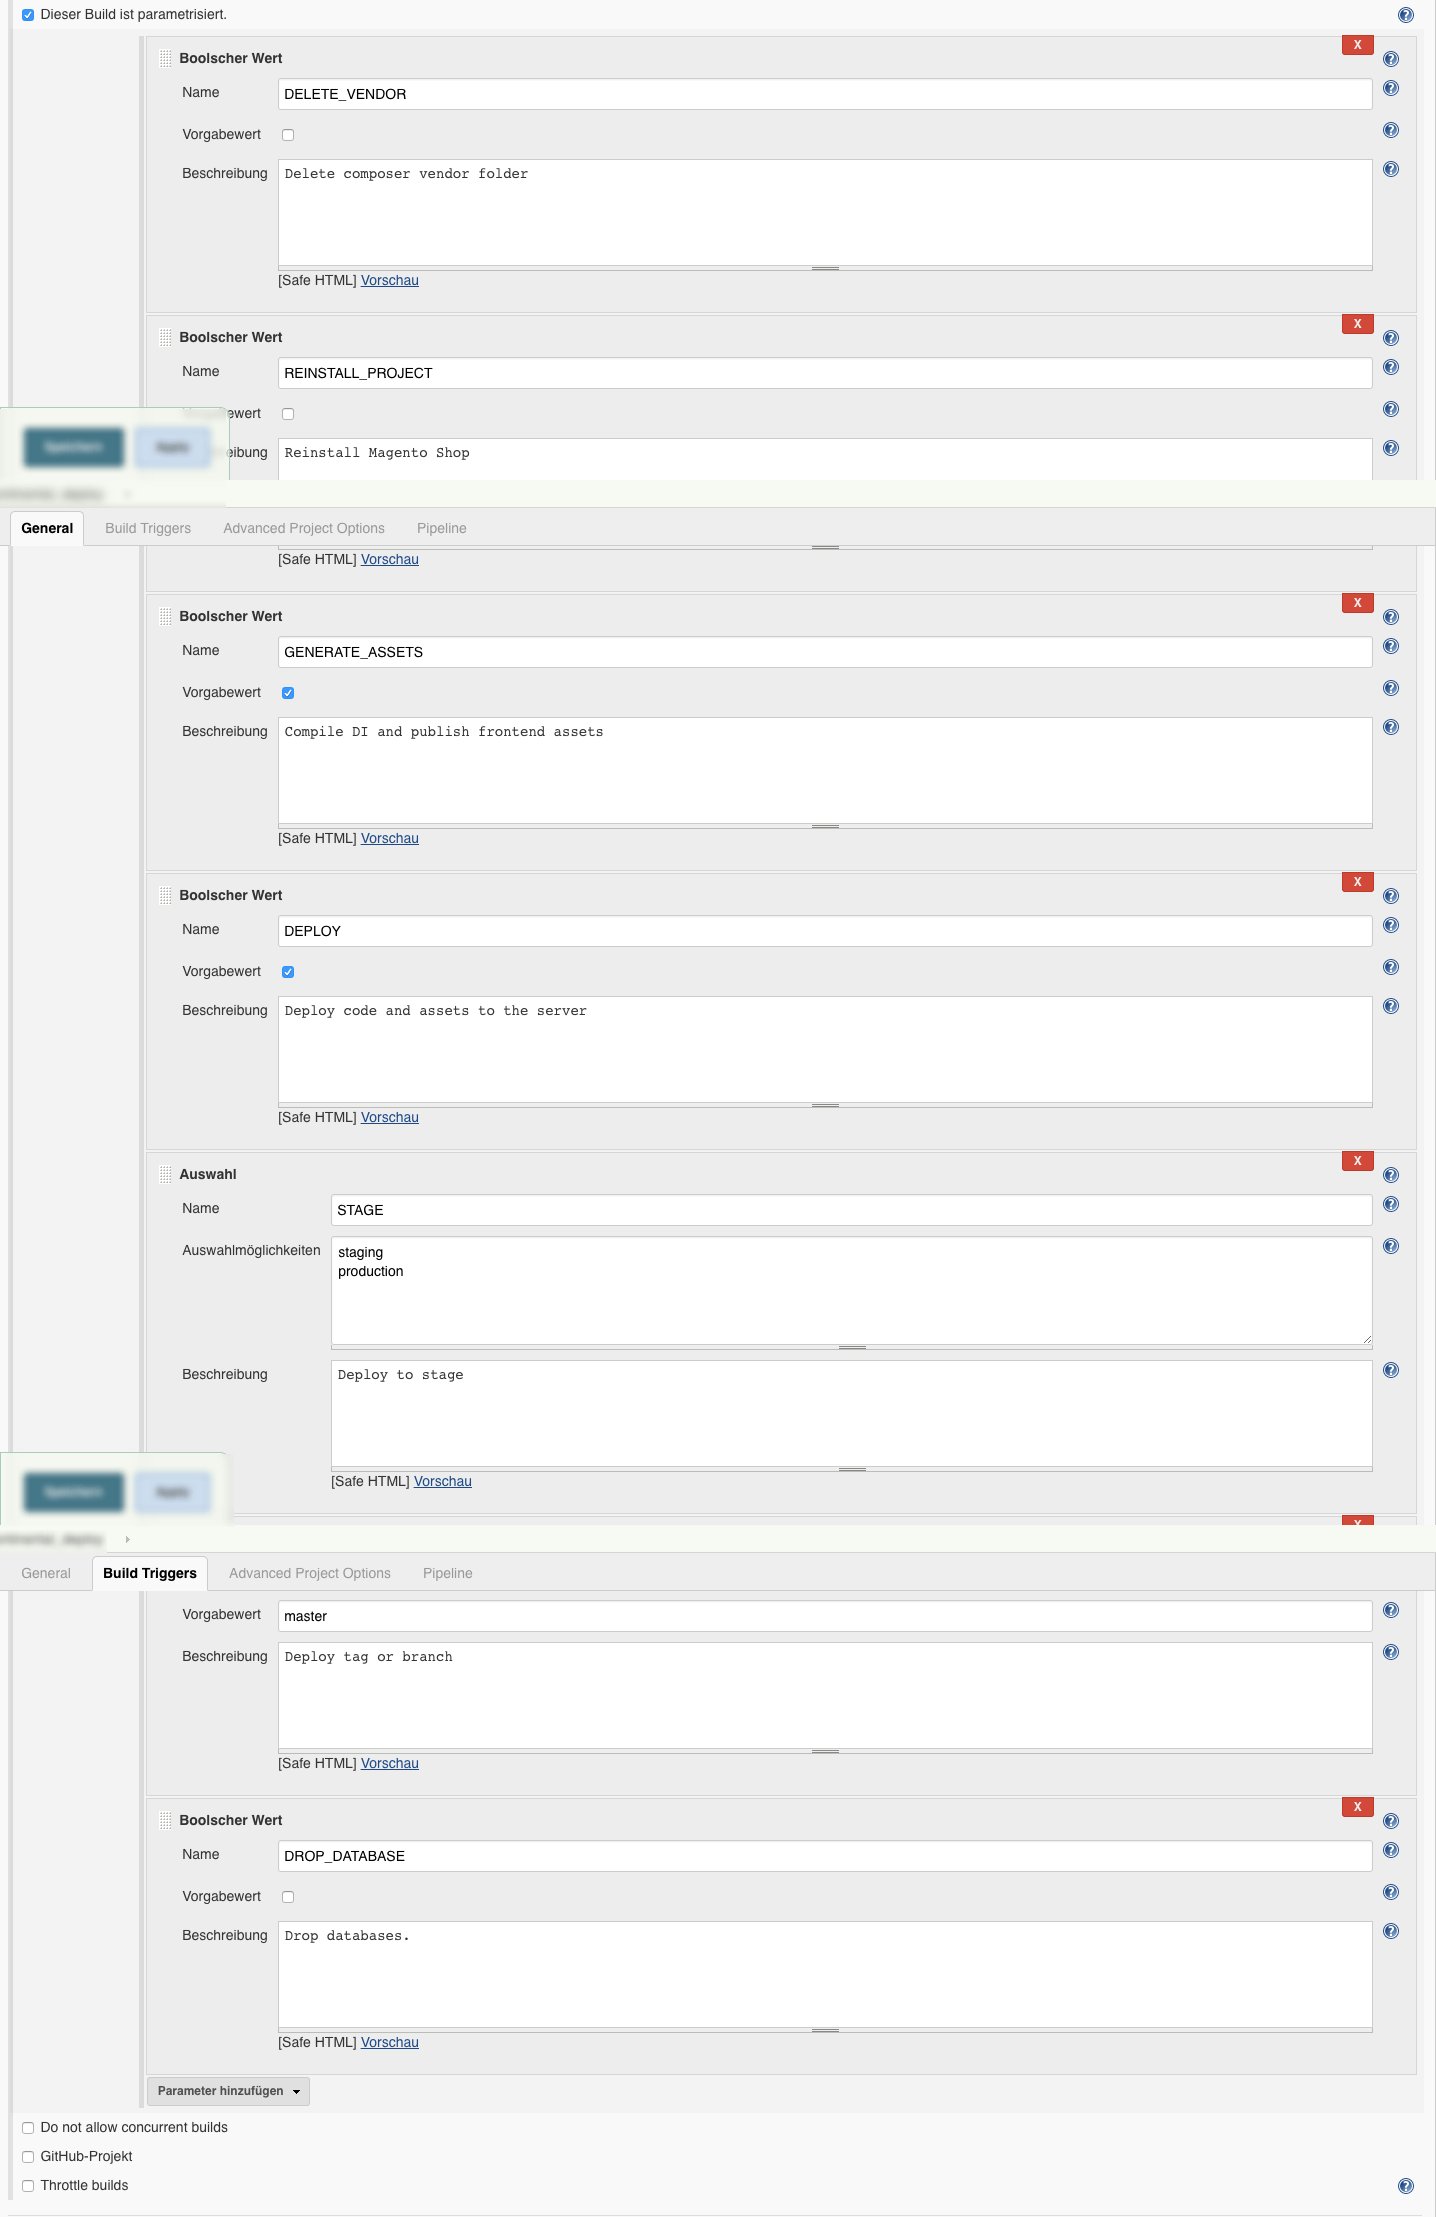
The TAG and STAGE environment variables are set by Jenkins and defined for each Build, before starting the actual Build.
A possible command might state like this:
./dep deploy --tag=3.2.0.1 production
This call will rollout the release with the tag 3.2.0.1 to the production environment.
Though our deployer setup is no longer making a git connection we are providing the tag here to identify the release later on.
Deployer Setup
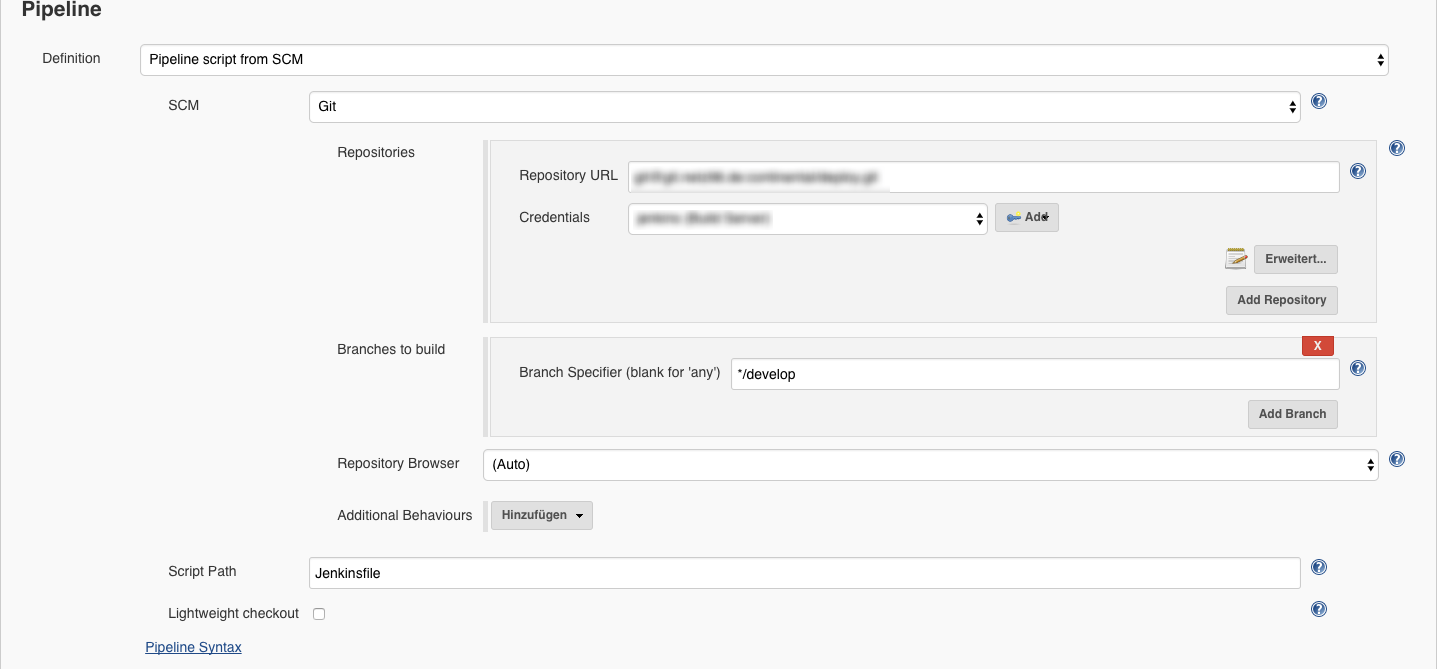
So this is how our Deploy Repository is setup:
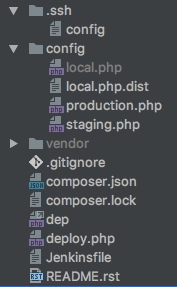
Here you can also see the Jenkinsfile defining the Build-Pipeline. We have a config directory containing the configurations for our environments. Including a possible local setup. The local setup is really helpful when improving or upgrading the deployment.
In our deploy repository we have a composer.json to manage the necessary dependencies for the deployment. Them being deployer itself and our own set of tasks. Having our tasks in a dedicated repository gives us the possibility to share those tasks through out all deployments. That’s one thing I didn’t like with the default deployer approach.
"require": {
    "deployer/deployer": "^4.0",
    "n98/lib.n98.framework.deployer": "^1.0.0"
}
deploy.php
Let’s take a look at the deploy.php file that defines the configuration and tasks that are necessary for our deployment. We will go into more Detail afterwards.
<?php
/**
 * @copyright Copyright (c) 1999-2016 netz98 GmbH (http://www.netz98.de)
 *
 * @see PROJECT_LICENSE.txt
 */
namespace Deployer;

use N98\Deployer\Registry;
use N98\Deployer\Task\BuildTasks;
use N98\Deployer\Task\CleanupTasks;
use N98\Deployer\Task\DeployTasks;
use N98\Deployer\Task\MagentoTasks;
use N98\Deployer\Task\SystemTasks;

require 'recipe/common.php';

/**
 * CONFIGURATION
 */
$sharedFiles = [
    'src/app/etc/env.php',
];
set('shared_files', $sharedFiles);

$sharedDirs = [
    'src/pub/media',
    'src/var/log',
    'src/var/session',
    'src/var/composer_home',
    'src/var/n98_integration',
];
set('shared_dirs', $sharedDirs);

set('writable_dirs', []);
set('keep_releases', 6);
set('ssh_type', 'native');
set('bin/n98_magerun2', 'n98-magerun2');
set('webserver-user', 'www-data');
set('webserver-group', 'www-data');
set('phpfpm_service', 'php7.0-fpm');
set('nginx_service', 'nginx');

/**
 * SERVERS
 */
$configLocal = __DIR__ . '/config/local.php';
if (is_file($configLocal)) {
    require_once $configLocal;
}
require_once __DIR__ . '/config/staging.php';
require_once __DIR__ . '/config/production.php';

/**
 * TASKS & CONFIG
 */
Registry::register();

/**
 * DEPLOYMENT PIPELINE
 */
desc('Deploy Project');
task(
    'deploy', [
        'deploy:initialize',
        'deploy:prepare',
        'deploy:release',
        BuildTasks::TASK_UPLOAD_SHOP,
        BuildTasks::TASK_UPLOAD_CONFIG_DIR,
        BuildTasks::TASK_UPLOAD_PUB_STATIC_DIR,
        BuildTasks::TASK_UPLOAD_VAR_GENERATION_DIR,
        BuildTasks::TASK_FIX_FILE_OWNERSHIP,
        'deploy:shared', // link shared dirs / files
        MagentoTasks::TASK_SYMLINKS_ENABLE,
        'deploy:symlink', // ACTIVATE RELEASE
        MagentoTasks::TASK_MAINTENANCE_MODE_ENABLE,
        MagentoTasks::TASK_CACHE_DISABLE,
        MagentoTasks::TASK_SETUP_UPGRADE,
        MagentoTasks::TASK_CONFIG_DATA_IMPORT,
        MagentoTasks::TASK_CMS_DATA_IMPORT,
        MagentoTasks::TASK_CACHE_ENABLE,
        BuildTasks::TASK_FIX_FILE_OWNERSHIP,
        'deploy:clear_paths',
        MagentoTasks::TASK_MAINTENANCE_MODE_DISABLE,
        SystemTasks::TASK_PHP_FPM_RESTART,
        // SystemTasks::TASK_NGINX_RESTART,
        CleanupTasks::TASK_CLEANUP,
        'success',
    ]
);

after('deploy:prepare', BuildTasks::TASK_SHARED_DIRS_GENERATE);

// Rollback in case of failure
onFailure('deploy', DeployTasks::TASK_ROLLBACK);
As you can see this file does not look like the default deploy.php files using lambda functions. We have moved the Task definition into a class N98\Deployer\Registry that is provided by n98/lib.n98.framework.deployer. Furthermore we have moved our tasks and their identifier to seperate classes to get them reusable and shareable using a composer package.
Now let’s have a look at each section.
deploy.php – configuration
$sharedFiles = [
    'src/app/etc/env.php',
];
set('shared_files', $sharedFiles);

$sharedDirs = [
    'src/pub/media',
    'src/var/log',
    'src/var/session',
    'src/var/composer_home',
    'src/var/n98_integration',
];
set('shared_dirs', $sharedDirs);

set('writable_dirs', []);
set('keep_releases', 6);
set('ssh_type', 'native');
set('bin/n98_magerun2', 'n98-magerun2');
set('webserver-user', 'www-data');
set('webserver-group', 'www-data');
set('phpfpm_service', 'php7.0-fpm');
set('nginx_service', 'nginx');
We have added the default shared files and directories to the deployer default parameters shared_files and shared_dirs.
ssh_type is set to native so we are using the ssh client provided by the operation system.
webserver-user and webserver-group are used to apply the correct directory permissions.
phpfpm_service and nginx_service is used to restart those services automatically during the deployment (using a custom task).
deploy.php – servers
$configLocal = __DIR__ . '/config/local.php';
if (is_file($configLocal)) {
    require_once $configLocal;
}
require_once __DIR__ . '/config/staging.php';
require_once __DIR__ . '/config/production.php';
We have put the server specific configurations into separate files in the directory config. This way we can have a local.php.dist to setup a config for a local dev-environment.
We could extend this to just include the environment provided as a parameter to deployer.
A server config might look like this:
<?php
namespace Deployer;

use N98\Deployer\RoleManager;

$deployPath = '<PATH_ON_SERVER>';
$sshConfigFile = '.ssh/config';

$production = server('web01', '<IP>');
$production->user('admin');
$production->identityFile();
$production->set('deploy_path', $deployPath);
$production->stage('production');

RoleManager::addServerToRoles('web01', ['web', 'db']);
We are using the identityFile .ssh/config provided within the deploy repository. At first, I was assuming that deployer will use this file when running the native ssh commands and pass the config-file as a parameter like ssh -i .ssh/config . As it turns out it does not do that, instead it parses the ssh config-file and just extracts the Hostname, user and IdentifyFile directives.
Though I will be creating a pull request that will make the usage of the config-file possible. I have tested it, and it works well, because why shouldn’t it.
Futhermore we have created a class called RoleManager, which we use to define roles for servers and assign tasks to those roles. This functionality is needed for easily triggering specific tasks only on specific servers. It will be translated to $task->onlyOn() call later in the deployment. The main advantage and purpose is the ease of use and portability throught multiple deployment projects.
deploy.php – adding the tasks
To register our default Tasks we have created a Registry class that takes care of this process. This class also takes the roles mentioned above into account.
Registry::register();
With deployer you can define as much tasks as you like. It all comes together with your deploy pipeline that you define in your deploy.php.
deploy.php – task classes
We have split up all of our tasks to the following classes:
- BuildTasks – tasks for basic initialization and an overwrite for the rollback
- CleanupTasks – improved cleanup task
- DeployTasks – improved rollback task
- MagentoTasks – our Magento specific tasks
- SystemTasks – tasks to restart nginx and php-fpm
Those classes have class constants that are used to register the tasks and to define the build pipeline.
I won’t go into to much detail regarding all the Tasks, because some of them are just triggering Magento commands. And it would just go beyond the scope of this post.
If you are interested in more details about the Tasks just let me know, we might add another post highlighting and explaining them.
Here is an excerpt from MagentoTasks:
class MagentoTasks
{
    const TASK_SETUP_UPGRADE = 'magento:setup_upgrade';

    // …

    /**
     * Run Magento setup:upgrade
     */
    public static function runSetupUpgrade()
    {
        $srcDir = self::$srcDir;
        \Deployer\run("cd $srcDir; php bin/magento setup:upgrade --keep-generated");
    }

    // …
}
This is what the task action and the definition inside the Registry::register(); looks like this:
self::registerTask(
    MagentoTasks::TASK_SETUP_UPGRADE, 'run Magento Updates',
    function () { MagentoTasks::runSetupUpgrade(); }, ['db']
);
With the Registry::registerTask being defined like this:
protected static function registerTask($code, $desc, \Closure $body, array $roles = null)
{
    \Deployer\desc($desc);
    $task = \Deployer\task($code, $body);

    if (is_array($roles)) {
        $servers = RoleManager::getServerListByRoles($roles);

        $task->onlyOn($servers);
    }

    return $task;
}
Using this method we are adding the default tasks to the deployer project and are applying the roles mentioned above.
deploy.php – deploy pipeline
Having defined all of our tasks, we can now take care of the deploy pipeline. This is how our default deploy pipeline for deployer is defined.
desc('Deploy Project');
task(
    'deploy', [
        'deploy:initialize',
        'deploy:prepare',
        'deploy:release',
        BuildTasks::TASK_UPLOAD_SHOP,
        BuildTasks::TASK_UPLOAD_CONFIG_DIR,
        BuildTasks::TASK_UPLOAD_PUB_STATIC_DIR,
        BuildTasks::TASK_UPLOAD_VAR_GENERATION_DIR,
        BuildTasks::TASK_FIX_FILE_OWNERSHIP,
        'deploy:shared', // link shared dirs / files
        MagentoTasks::TASK_SYMLINKS_ENABLE,
        'deploy:symlink', // ACTIVATE RELEASE
        MagentoTasks::TASK_MAINTENANCE_MODE_ENABLE,
        MagentoTasks::TASK_CACHE_DISABLE,
        MagentoTasks::TASK_SETUP_UPGRADE,
        MagentoTasks::TASK_CONFIG_DATA_IMPORT,
        MagentoTasks::TASK_CMS_DATA_IMPORT,
        MagentoTasks::TASK_CACHE_ENABLE,
        BuildTasks::TASK_FIX_FILE_OWNERSHIP,
        'deploy:clear_paths',
        MagentoTasks::TASK_MAINTENANCE_MODE_DISABLE,
        SystemTasks::TASK_PHP_FPM_RESTART,
        // SystemTasks::TASK_NGINX_RESTART,
        CleanupTasks::TASK_CLEANUP,
        'success',
    ]
);

after('deploy:prepare', BuildTasks::TASK_SHARED_DIRS_GENERATE);

// Rollback in case of failure
onFailure('deploy', DeployTasks::TASK_ROLLBACK);
We have added the deploy:initialize task which will detect the stable release and save it with \Deployer\set(‘release_path_stable’, $releasePathStable);
The BuildTasks::TASK_SHARED_DIRS_GENERATEwill ensure the necessary shared directories are available.
The last thing I want to point out regarding the pipeline, is the rollback after an error during the deployment.
onFailure('deploy', DeployTasks::TASK_ROLLBACK);
By default deployer does not rollback in case somethings goes sideways. Deployer has a default task defined but it is not used by default, you would have to call it manually.
Caveats
While setting up this deployment pipeline we ran into different troubles with deployer. The rollback task and the detection of the current stable release are a bit buggy which is why we implemented an improved version ourselves. This improved version will not use an integer as the release directory but instead used the tag or branch being provided to deployer. The branch is getting postfixed with the current date and for the tags there is also a check to not deploy to the same directory twice.
During development the releases folder might look something like this:
develop-20170112142355
develop-20170112142709
develop-20170112143301
develop-20170112145154
develop-20170113073002
Furthermore the standard cleanup tasks was also not quite stable and reliable, so we had to overwrite that too. We had situations where the former current release was deleted due to an issue how deployer builds its internal release_list. That error only occurred when multiple deploys went sideways.
I am evaluating how much of our adjustments can be provided as a pull-request to the deployer project itself.
Summary
This is it, I hope you gathered some insights on how our deployment setup works and how you could setup your own.
In the next blog post we will share some thought on where we want to go with this deployment in the future and how it is re-used in different environments and server setups.
If you want to know or see more details, feel free to leave a comment or contact me directly on twitter, see the authors box below.
See you next time.
Teaser
I am working on a default setup for a Magento2 deployment that can be used as starting point for deployment. Containing the most important tasks, the possibility to use for Pipeline builds, a default deployer setup, etc.
So stay tuned 🙂
Magento1 since 2008 / Magento2 since 2015
Passionate Road Bike Rider (~3.500km/yr)
Loves building software with a elaborate architecture and design
3x Magento Certified
Software Developer >10 years
Head of Magento Development @ netz98


![Deploying Magento2 – Future Prospects [4/4]](https://dev98.de/wp-content/uploads/2017/02/n98_push_deployment_process_future_overview-602x270.png)
![Deploying Magento2 – Releasing to Production [3/4]](https://dev98.de/wp-content/uploads/2017/01/n98_push_deployment_deployer_2.png)
![Deploying Magento2 – Jenkins Build-Pipeline [2/4]](https://dev98.de/wp-content/uploads/2017/01/jenkins_build_pipeline-604x228.png)