
This post is part of series:
- History and Overview of Magento2 Deployment
- Jenkins Build-Pipeline Setup (building assets, controlling the deployment)
- Releasing to Production (delivering code and assets, managing releases)
- Future Prospect (cloud deployment, artifacts)
Recap
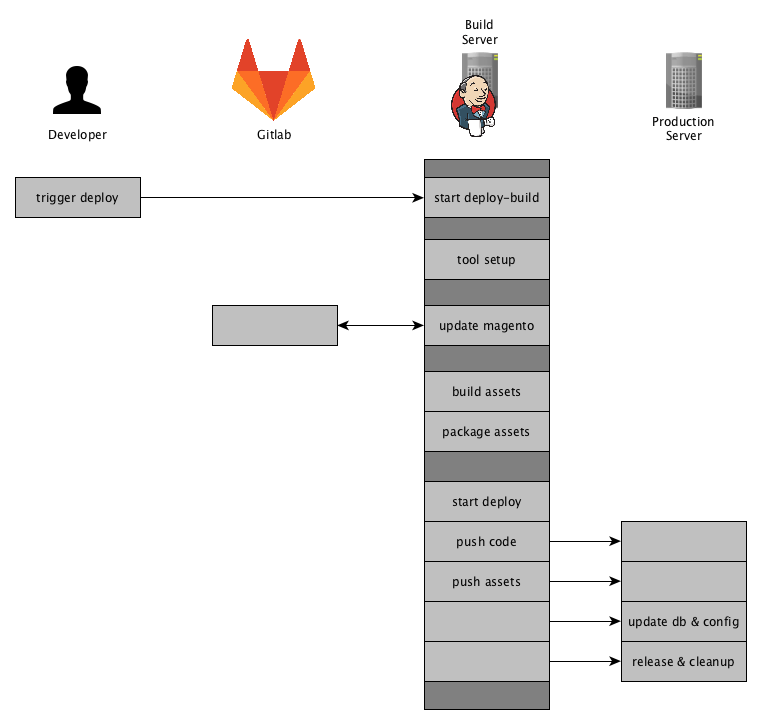
In the post Deploying Magento2 & History / Overview [1/4] we showed an overview of our deployment for Magento2 and this post will go into more detail on what is happing on the Build-Server and how it is done. So to get you up to speed, this is the overview of our process and what this post will cover:

Jenkins Build-Pipeline
Our Build Server is basically a Jenkins running on a dedicated server. The Jenkins Server is the main actor in the whole deployment process.
It will control the specific phases of the deployment and provide an overview and a detailed monitoring of the output of each phase.
We are using the Jenkins Build Pipeline feature to organize and control our deployment.
The Magento2 deployment is split up into the following stages:
- Tool Setup – ensuring all tools are installed
- Magento Setup – updating the source-code and update composer dependencies
- Asset Generation – generating the assets in pub/static var/di var/generation and providing them as packages
- Deployment – delivering the new release to the production server
The Jenkinsfile
There are different ways to create a Jenkins Build-Pipeline, one is to create a Jenkinsfile that defines the stages and the commands to run. We are using just that approach and put that Jenkinsfile into a git repository separate from our magento2 repository. Though this is an approach we have been following for years now, I still think it is best to have your deployment separate from the actual project. But as so often that depends on the individual needs.
We will add some more dependencies to this repository later.
Next you will see a skeleton for the Jenkinsfile we are using. I left out the details for the stages for now and will show those further down the post.
node {
    // ENV variables
    env.PWD = pwd()
    env.STAGE = STAGE
    env.TAG = TAG
    env.REINSTALL_PROJECT = REINSTALL_PROJECT
    env.DELETE_VENDOR = DELETE_VENDOR
    env.GENERATE_ASSETS = GENERATE_ASSETS
    env.DEPLOY = DEPLOY

    try {
        // Update Deployment
        checkout scm

        stage 'Tool Setup'
        // Setup tools here

        stage 'Magento Setup'
        // Setup and update Magento

        stage 'Asset Generation'
        if (GENERATE_ASSETS == 'true') {
            // Generate and package assets
        }

        stage 'Deployment'
        if (DEPLOY == 'true') {
            // Trigger deployment and start release
        }

    } catch (err) {
        currentBuild.result = 'FAILURE'
        throw err
    }
}
The stage keyword defines a new stage and takes a string as a parameter. You can see the stages I mentioned earlier defined here. The update of our deployment itself is not included as a stage.
We are using multiple ENV variables that are defined when starting the build. By default DEPLOY and GENERATE_ASSETS are set to true , but we could choose to leave out on of them. So in case there was an error during the Deployment we don’t need to re-generate all the assets.
The ENV variables REINSTALL_PROJECT and DELETE_VENDOR are used within the stage Magento Setup.
The ENV variable STAGE is used to identify the server environment we are deploying to, like staging or production. This variable is to be selected when starting the Build and can be individualized to the needs in the project at hand.
The ENV variable TAG is defining the git branch or git tag where are deploying with this build. It is used later on in the process multiple times.
Stage Tool Setup
stage 'Tool Setup'
sh "${phpBin} -v"
// Composer deps like deployer
sh "composer.phar install"
// Phing
if (!fileExists('phing-latest.phar')) {
    sh "curl -sS -O https://www.phing.info/get/phing-latest.phar -o ${phingBin}"
}
sh "${phingCall} -v"
sh "printenv"
The first stage “Tool Setup” will install or update the tools needed through out the deployment.
As you can see we are using composer here to pull in our tools like for example deployer.
Also we are using phing for some parts during the deployment process, so we are ensuring that the latest phing version is present.
Stage Magento Setup
stage 'Magento Setup'
if (!fileExists('shop')) {
    sh "git clone ${magentoGitUrl} shop"
} else {
    dir('shop') {
        sh "git fetch origin"
        sh "git checkout -f ${TAG}"
        sh "git reset --hard origin/${TAG}"
    }
}
dir('shop') {
    sh "${phingCall} jenkins:flush-all"
    sh "${phingCall} jenkins:setup-project"
    sh "${phingCall} jenkins:flush-all"
}
In this stage we are updating the Magento Setup the Build needs to create the assests.
It basically consists of two steps:
- Setup or Update the Source-Code of the Magento Shop
- Setup or Update the Magento-Database
We are cloning the repository containing the customer project in the directory shop. If we have already cloned the repository we will just update to the tag or branch that is to be deployed.
Next-up is the project setup using the phing-call jenkins:setup-project. This phing-call is defined by the phing scripts inside our shop repository.
This call will
- install the magento composer dependencies,
- re-install the project therefore deleting the app/etc/env.php, (using REINSTALL_PROJECT )
- create the database if necessary
- run setup:upgrade
Up until recently a database was necessary to create the assests. As far as I know, there is plan to remove the requirement of having a database during the assets creation.
The phing tasks called in this stage are re-used from our Continous Build Jobs that we run on develop, master, feature and release branches for all of our projects.
Those Build Jobs are automatically running the Unit and Integration Tests, generating the documentation, Running Code Analyzers and summarizing all this information in a nice little Dashboard.
Maybe we will have a blog-post about that too. Let’s move on to the next stage.
Stage Asset Generation
stage 'Asset Generation'
dir('shop') {
    if (GENERATE_ASSETS == 'true') {
        sh "${phingCall} deploy:switch-to-production-mode"
        sh "${phingCall} deploy:compile"
        sh "${phingCall} deploy:static-content"
        sh "bash bin/build_artifacts_compress.sh"

        archiveArtifacts 'config.tar.gz'
        archiveArtifacts 'var_di.tar.gz'
        archiveArtifacts 'var_generation.tar.gz'
        archiveArtifacts 'pub_static.tar.gz'
        archiveArtifacts 'shop.tar.gz'
    }
}
During this stage the deploy job will compile all assets needed for running Magento2 in production-mode.
Therefore we ensure we are in production-mode and basically call php bin/magento setup:di:compile and php bin/magento setup:static-content:deploy .
Those phing-calls you see above are executing the following commands:
php bin/magento deploy:mode:set --skip-compilation production

rm -Rf var/di
rm -Rf var/generation

php bin/magento setup:di:compile

bin/magento setup:static-content:deploy --theme=NAMESPACE/base --theme=Magento/backend --language=en_US --language=de_DE
The Bash-Script bin/build_artifacts_compress.sh creates 5 tar files for
- shop – containing the Magento Source-Code
- pub_static – containing the contents of
pub/staticdirectory - var_generation – containing the contents of
var/generationdirectory - var_di – containing the contents of
var/didirectory - config – containing config yaml-files that can be imported using config:data:import
The config:data:import command is provided by the Semaio_ConfigImportExport which we are using to manage our systems configuration through. https://github.com/semaio/Magento2-ConfigImportExport
After the artifacts have been created, we use the Jenkins archiveArtifacts command to archive the latest artifacts for this build and make them available per HTTP-link in a consistent directory.
At the moment we are thinking about just creating one artifact instead of 5 and using that from here on. This will have some more advantages that we will cover in our post: “Future Prospect (cloud deployment, artifacts)”
Now we have prepared all the artifacts we need and are ready to create the new release on our servers and publish it. So now for the final stage “Deployment”.
Stage Deployment
stage 'Deployment'
if (DEPLOY == 'true') {
    sshagent (credentials: [jenkinsSshCredentialId]) {
        sh "./dep deploy --tag=${TAG} ${STAGE}"
    }
}
This Stage has probably the shortest content as far as the code in the Jenkinsfile is concerned. We are just triggering the Deployer while passing the STAGE and the TAG to it.
Deployer is a Deployment Tool for php and is more or less based upon capistrano and following the same concepts applied in capistrano.
We have defined quite some Magento2 related Deployer Tasks and created some adjustments to the core-tasks fixing bugs or adjusting them to our needs.
The details what we have done and on how we are using deployer to release the code and pushing the assets to the server environment will be covered in the upcoming post.
The Stage View of the Pipeline
At this point we have defined the Build-Pipeline and are ready to execute it.
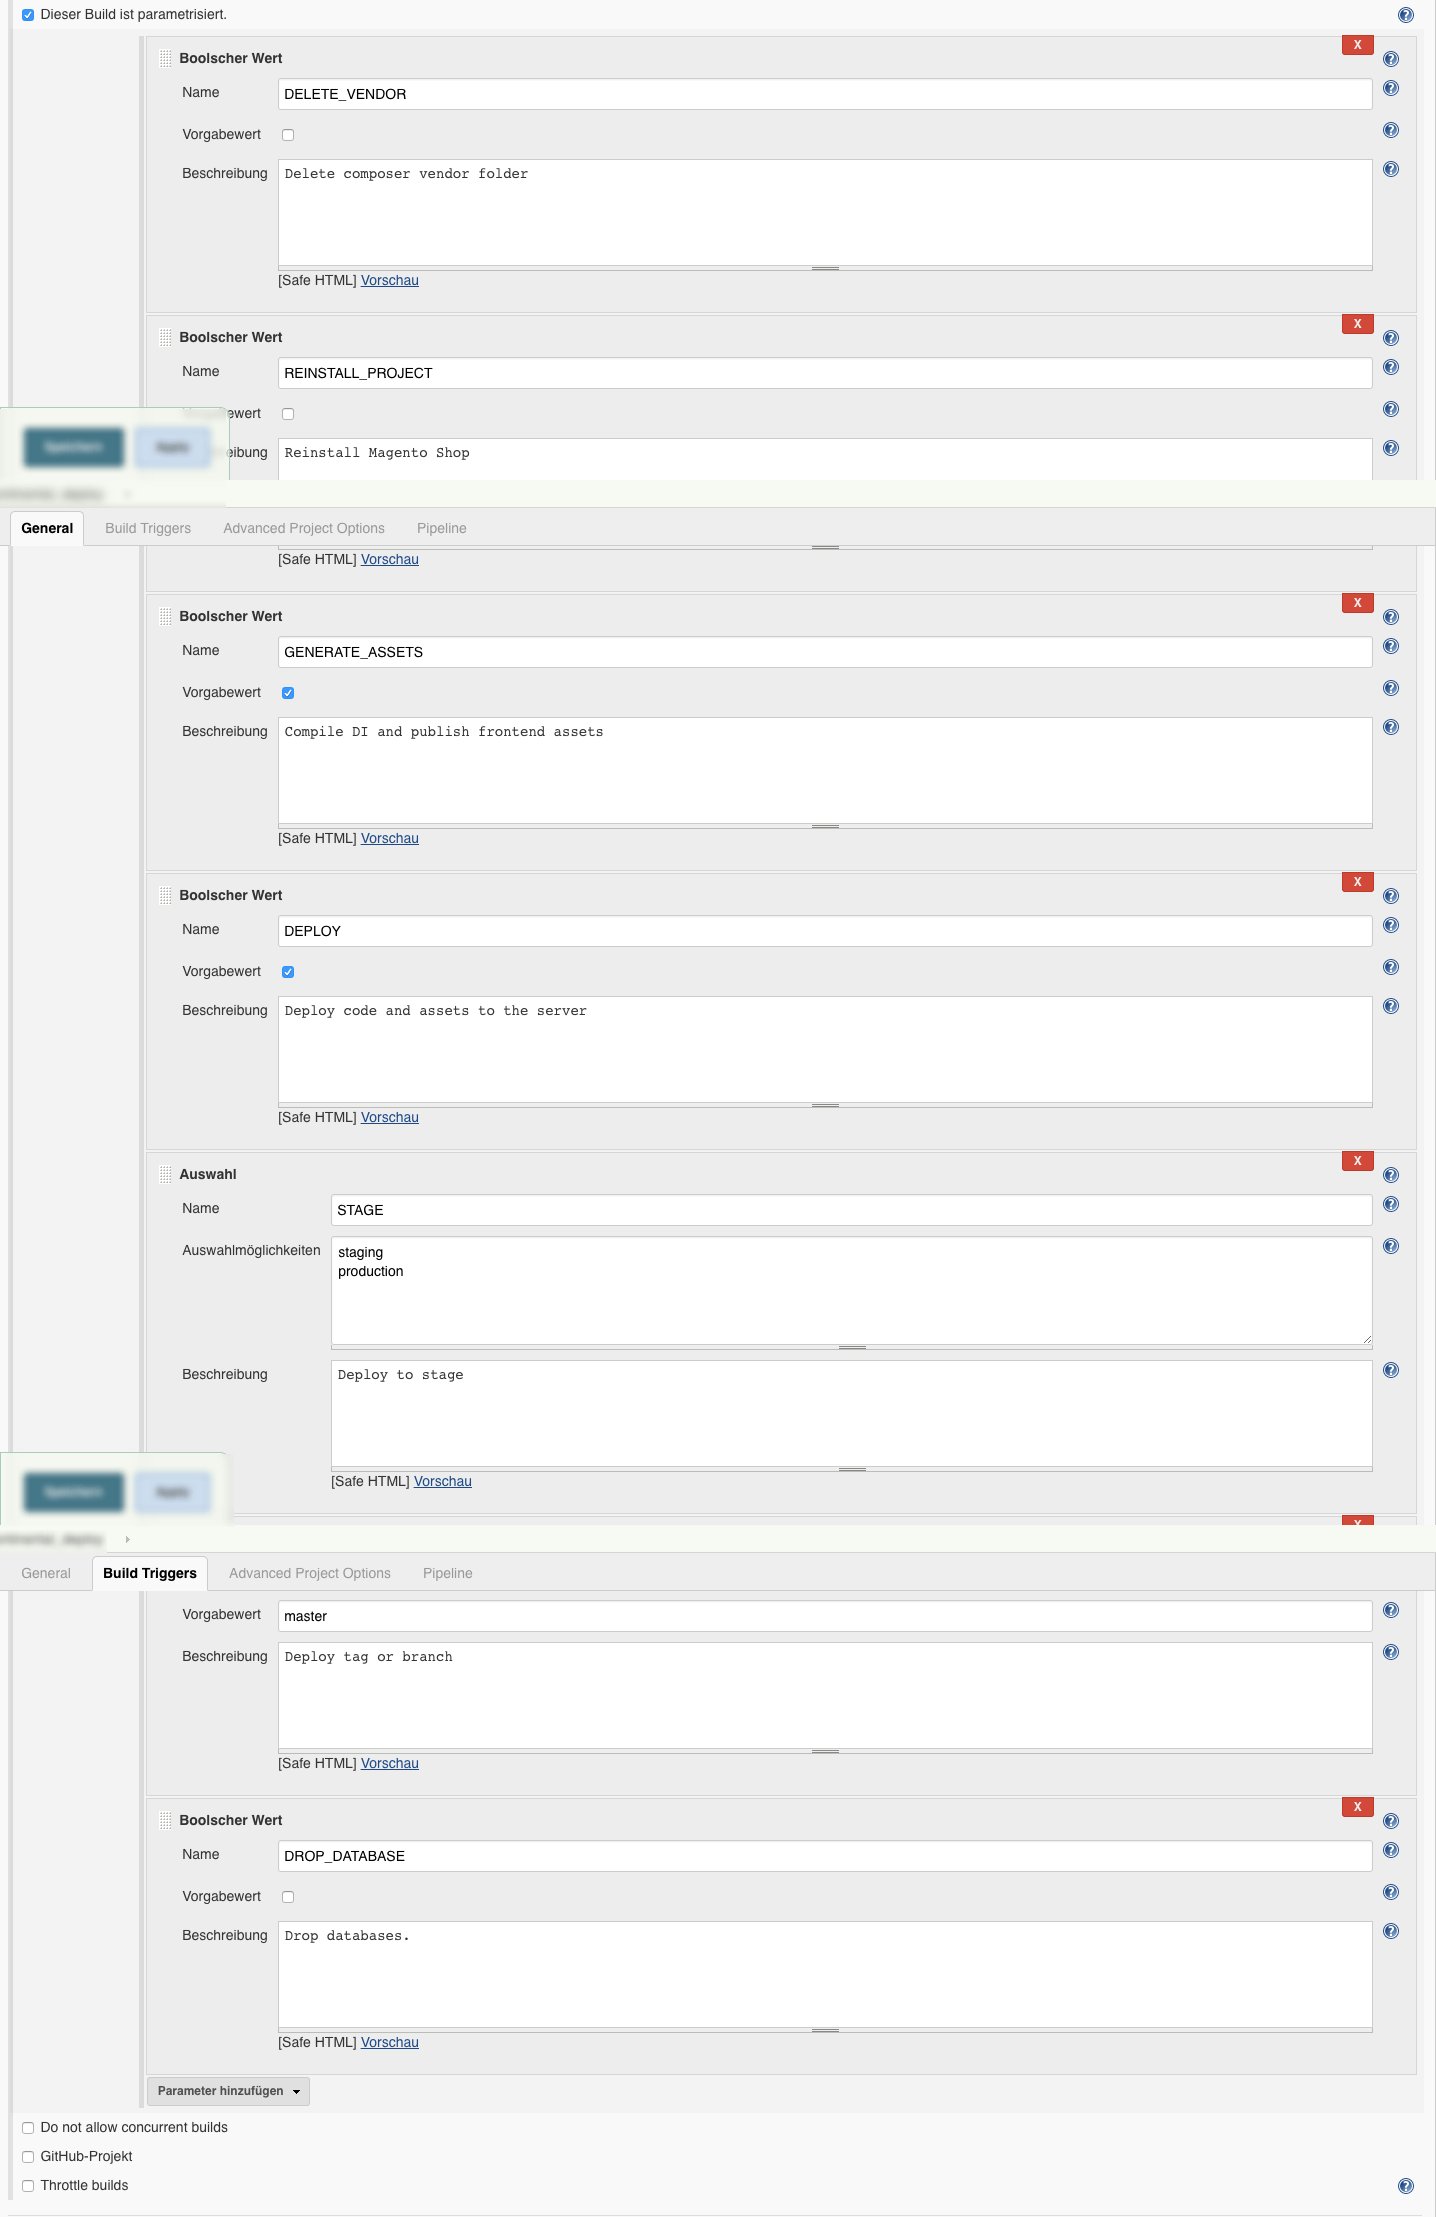
We do so by configuring the parameters as needed in this form:
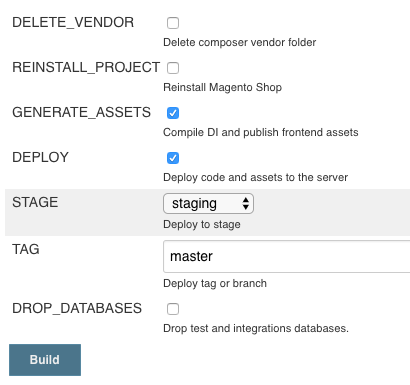

You can see the Environment Variables used in the above mentioned code samples. The image shows the default form with pre-selected variables.
In some cases it is necessary to delete the vendor directory completely or to drop the jenkins database.
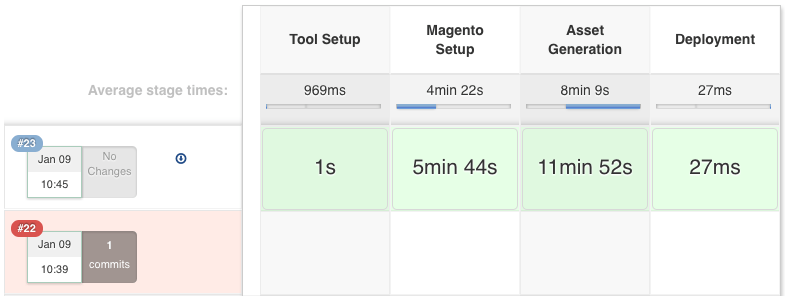
When running the introduced Build-Pipeline, you are presented with an informative stage view that shows the stages and their completion.
We can evaluate how our Deployment is progressing and get an estimate how long it will take to finish the stage(s).

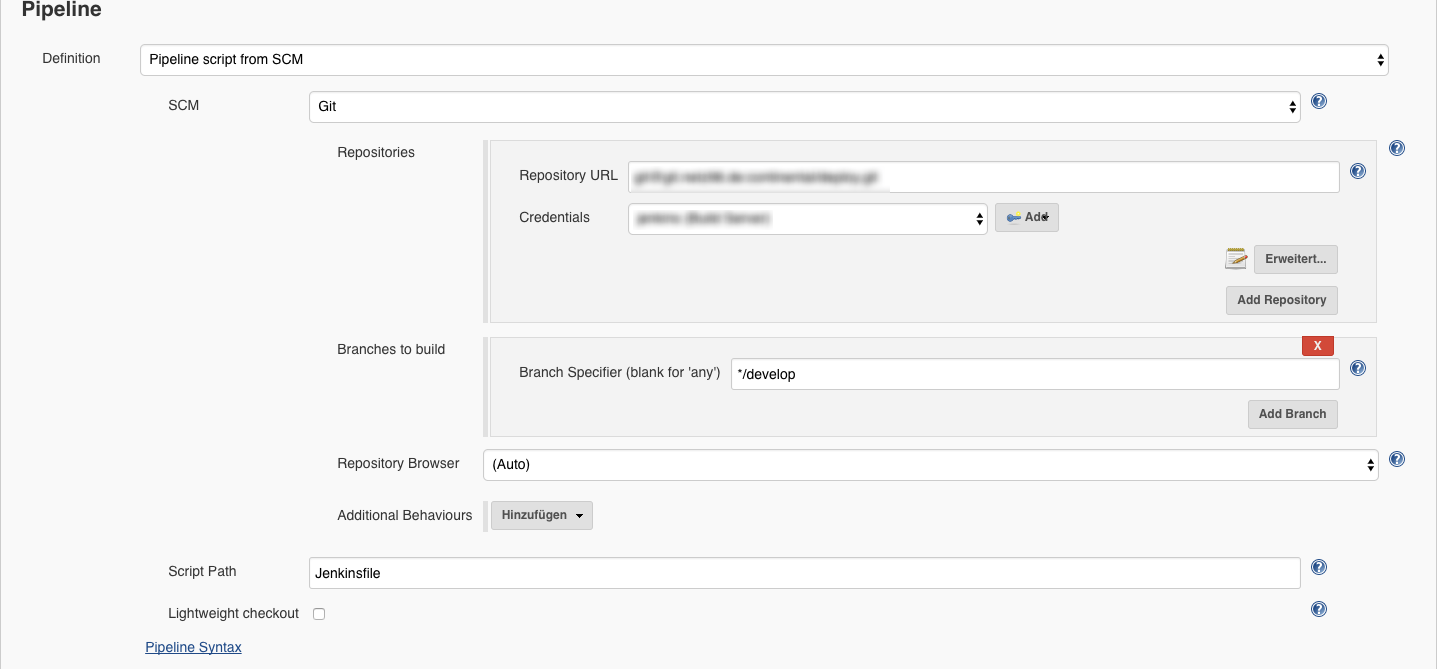
The Jenkins Job Configuration
We are creating our projects based on the pipeline project.
Then the parameters are added and the git repository url and that’s basically it.
Here are some screenshots:
Summary
This is the end of the introduction to our Build-Pipeline Setup for Deployments. The next post will cover details to our php-deployer setup.
I really like the automated and centralized way of Deploying our Magento Shops and of course the resulting advantages. Whenever somethings automated you don’t need to explicitly know or remember all the details of the deployment. It just takes so much of your mind and you can focus on more important tasks.
Well, that’s it for this post. I hope you enjoyed it and you find it informative. As always, if there any questions or if you’d like to know more about specific details, please feel free to comment or ask us directly on twitter or any other social plattform.
UPDATE 23-FEB-2017
Add Screenshot of the Build Form.
UPDATE 29-MAR-2017
Add Screenshot of the Build Configuration Parameters and Pipeline


Magento1 since 2008 / Magento2 since 2015
Passionate Road Bike Rider (~3.500km/yr)
Loves building software with a elaborate architecture and design
3x Magento Certified
Software Developer >10 years
Head of Magento Development @ netz98