Blog

  • How to adjust increment-ids in Magento 2

    Maybe almost every Magento developer has had the task to customize the increment-ids for orders or customers in Magento.

    Recap Magento 1

    In Magento 1 you had to change the column increment_prefix  in the table eav_entity_store .
    I am sure there are modules out there that let you achieve that in convenient way.
    We have done that by using Setup-scripts most of the time.
    When a new store is created you need set the increment_prefix afterwards and do so for all entities that you need and that are defined in eav_entity_type.
    So far an rather straight forward task I would say.

    What has changed in Magento 2

    Let’s take a look at the eav_entity_store  table.

    In this database an order and a rma has already been created.
    But as you can see the order and customer entity no longer is maintained within this table.

    In Magento 2 the increment-id generation mechanism basically has not changed for certain entities. The increment-id generation for customers and RMAs still uses the eav_entity_store .

    The sales module has received some changes regarding the generation of those increment-ids.

    Let’s have a look at what changed in Magento2 regarding the order increment-id generation.
    There are two new tables that you may not have seen yet, them being sales_sequence_meta  and sales_sequence_profile .
    In the example below you see the content of those for the default website and store setup.

    Table sales_sequence_meta

    There is a table called sales_sequence_meta  which defines store-specific sequence-tables for the sales entity-types.

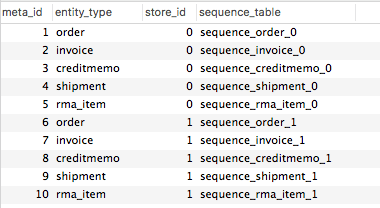
    Table sales_sequence_profile

    Then we have a table sales_sequence_profile  that contains the configuration for the increment-id generation.

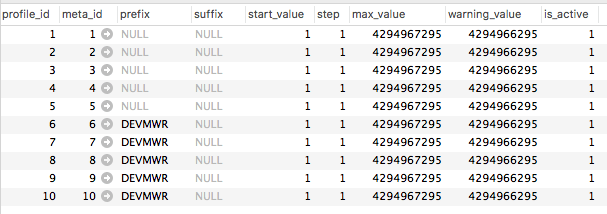
    Most of the columns are pretty self-explanatory.
    You can define a prefix  and suffix  that is added to the beginning respectively the ending of the generated increment-id.
    With the start_value  you can define the first increment-id.
    The step  column defines the increments that are made between increment-ids.

    So to change the prefix for the order increment-ids we need to change to column prefix to the desired value, “DEVMWR” in this case.
    This will result in an order increment-id like DEVMWR000000004

    After that change the orders will receive a custom increment-id.

    If you have any notes feel free to leave a comment.

  • Creating Configurable Products

    Basically there are different ways for creating Configurable Products in Magento2 (like in Magento1).
    You can create it using the Admin Panel, using a Setup\InstallData or Setup\UpgradeData class or during a custom import.

    ADDING THE ATTRIBUTE

    Let’s assume we are creating our attribute using the Setup\UpgradeData class in our module.
    The code we might initially create could look something like the following:

        protected function addAttributeDiameter()
        {
            $this->eavSetup->addAttribute(
                ProductModel::ENTITY,
                'dev98_diameter',
                [
                    'type' => 'int',
                    'backend' => '',
                    'frontend' => '',
                    'label' => 'Diameter',
                    'input' => 'select',
                    'class' => '',
                    'source' => '',
                    'global' => 1,
                    'visible' => true,
                    'required' => false,
                    'user_defined' => true,
                    'default' => null,
                    'searchable' => true,
                    'filterable' => true,
                    'comparable' => true,
                    'visible_on_front' => true,
                    'used_in_product_listing' => true,
                    'unique' => false,
                    'apply_to' => 'simple,configurable',
                    'system' => 1,
                    'group' => 'General',
                ]
            );
    
            // Add Options
            $attributeId = $this->eavSetup->getAttributeId(
                ProductModel::ENTITY, 'dev98_diameter'
            );
            $options = [
                'attribute_id' => $attributeId,
                'values' => ["10", "20", "30", "40", "50", "60", "70", "80", "90",],
            ];
            $this->eavSetup->addAttributeOption($options);
        }

    The above code will create an attribute with the attribute-code ‘dev98_diameter’, which is available for simple and configurable products, within the group ‘General’ and is searchable, filterable etc… Futhermore we are adding some attribute options as well.

    CREATING A CONFIGURABLE PRODUCT

    Now if you add this attribute to an attribute-set and try creating a configurable product for this attribute it won’t work out as you might expect.
    You will not see the attribute in the overlay ‘Create Product Configurations’  where you choose the attributes you want your product to be configurable with.

    In Magento 2 the Admin Edit Form for Products changed quite a bit.

    The most important change is, that the type of a product e.g. simple, configurable, etc. is no longer selected but determined automatically when saving the product.

    So the product type you select using the DropDown in the Admin Product Grid is obsolete and not really used.

    IMPROVING OUR UPDATEDATA CLASS

    Knowing that the product is virtual at the moment of creating our configurable product, we have to add to type ‘virtual’ to the apply_to parameter in our ‘Setup\UpgradeData’ class.

           $this->eavSetup->addAttribute(
                ProductModel::ENTITY,
                'dev98_diameter',
                [
                    'type' => 'int',
                    'backend' => '',
                    'frontend' => '',
                    'label' => 'Diameter',
                    'input' => 'select',
                    'class' => '',
                    'source' => '',
                    'global' => 1,
                    'visible' => true,
                    'required' => false,
                    'user_defined' => true,
                    'default' => null,
                    'searchable' => true,
                    'filterable' => true,
                    'comparable' => true,
                    'visible_on_front' => true,
                    'used_in_product_listing' => true,
                    'unique' => false,
                    'apply_to' => 'simple,configurable,virtual', // Add virtual type here
                    'system' => 1,
                    'group' => 'General',
                ]
            );

    After running the ‘setup:upgrade’ command, flushing the cache and reloading our Admin Product Edit Form we can now see the attribute ‘dev98_diameter’ in the ‘Create Product Configurations’ overlay.

    From here-on we can create configurable products with our attribute as we please.

    SUMMARY

    To sum it up in short, you have to make your product attribute apply to type virtual to create configurable products.
    At least when you are creating you attributes programmatically like in InstallData/ UpgradeData or using a attributes import.

  • A Multi Factor Authentication Quickstart

    In the last couple of months, I started to dig deep into web security. I wanted to figure out, how the “dark side” works and how a hacker will act when he decided to penetrate my web application. So I downloaded a Kali Linux System, installed it on a virtual machine and started “hacking”…

    (more…)

  • Thoughts about custom attributes and the way to manage them!

    To add or update an EAV attribute in Magento, it is necessary to add setup scripts to your code base. If you don’t handle your custom attributes in setup scripts, you are not able to install your project from scratch, which could cause a lot of problems. For example, it makes it harder to run unit- and integration tests.

    So lets assume that we are working in a team with 4 developers and everybody has a different task. Each task needs a custom attribute in a different entity_type.

    I want to share my thoughts and summarize an overview of how the 4 developers could implement their setup scripts. Also, I want to show the advantages and disadvantages of each method.

    (more…)

  • Docker: Simplified container mapping for local development

    When you are working with docker on your local machine, you often have to map your local ports to different container and end up in a port-mapping-mess like this:

    • localhost:80 -> Local apache for native stuff
    • localhost:8080 -> Docker container with apache for testing
    • localhost:8100 -> Some sort of dockered WebApp
    • localhost:59924 -> “Yea, well … don’t know, lets check docker process-list …”

    To simplify this mess, we created a little proxy-script (+ environment setup) that will make your life much easier: https://github.com/netz98/docker-router-proxy

    The router proxy will add the ability to dispatch your request based on the container name. To archive this, it adds a special TLD which will be used to determine that we want to call an docker container.

    In our case (default) this will be .dock, but you can choose a different one if you like.

    After configuring the environment (as described within the project description on GitHub) you can simply call your container like this:

    http://my-service-container.dock

    this will be proxied to

    0.0.0.0:8999->80/tcp    my_service_container

    I’m using this script now for several days and it’s absolutely worth the time for setting up the environment. It’s very easy now to navigate through your services and projects just using your browser history.

    I’m very interested what you think about this approach and if you might have found other solutions for this?

    So, please leave a comment!


  • Array does not exist in webapi

    The Magento 2 webapi is very useful to publish entities to the world.
    One big advantages of the new webapi is the automatic generation of a swagger schema for RESTful API.
    If you prefer SOAP over REST you should also be happy to heat that Magento 2 will automatically generate all the WSDL stuff.

    Magento 2 analyses all the published classes/methods via PHP reflection.
    Any generated WSDL file contains a XSD with all the types used in the webservices.

    In some cases the generation stops with the following error message:

    Class "array" does not exist. Please note that namespace must be specified.

    What’s up with this message?

    (more…)