Tag: PHP

  • Run Mailhog in Docker and use it in PHP

    Run Mailhog in Docker and use it in PHP

    This post describes how you can install and configure Mailhog as SMTP Server for your local PHP development environment. This is useful to catch all outgoing emails.

    A running PHP and Docker environment is required to follow the instructions.

    Install Mailhog

    On my local machine, I have docker-compose.yml file which contains a lot of services (e.g MySQL, Elastic, Redis) which I use during the daily development.

    For our mailhog example we need only one service. Please create a docker-compose.yml with this content:

    version: '2'
    services:
        mailhog:
            container_name: mailhog
            image: mailhog/mailhog
            restart: always
            ports:
                - 1025:1025
                - 8025:8025

    Run docker-compose up -d mailhog to create and start the container. If the mailhog image does not exist, Docker will start to download the image from official Docker-Hub.

    Verify if everything is up and running.

    docker-compose ps
    Name      Command             State    Ports
    -------------------------------------------------------------------------------------
    mailhog   MailHog             Up       0.0.0.0:1025->1025/tcp, 0.0.0.0:8025->8025/tcp
    

    No you can use the TCP Port 1025 for sending email over SMTP protocol. The Port 8025 contains the Web-UI.

    Configure PHP

    Out goal is that PHP’s intern command “mail” uses our freshly installed Mailhog server. To effect this, we need to set the “sendmail_path” setting.

    Please modify your php.ini file and set the following directive:

    sendmail_path = docker exec -i mailhog sendmail -S localhost:1025

    From now, every “mail” command call uses the docker container with the name “mailhog” to send any email.

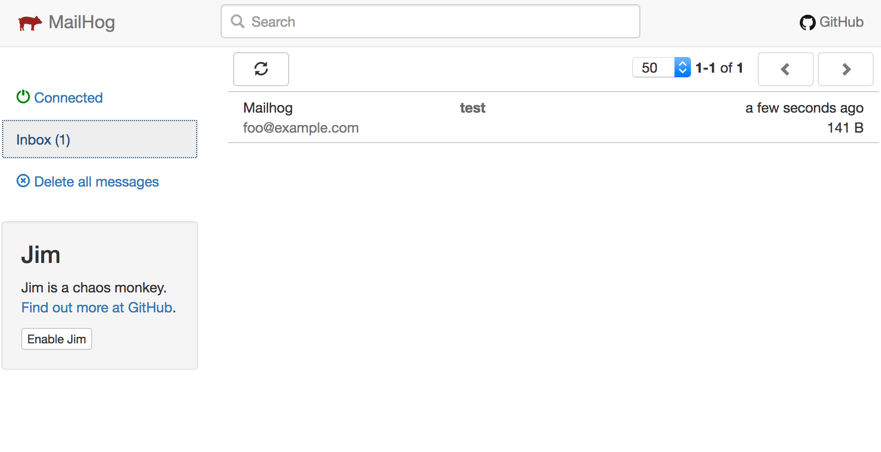
    We can test this with a simple PHP CLI call:

    php -r 'mail("foo@example.com", "test", time(), "From: Mailhog <mailhog@example.com>");'

    We should now be able to see the arrived message in the Web-UI. Open your browser with the address “http://localhost:8025”.

  • PSR-7 Standard  – Part 1  – Overview

    PSR-7 Standard – Part 1 – Overview

    This post is part of series:


    This is the first post of my new PSR-7 series. If you already use PSR-7 in your daily life as programmer you can skip the first part of this post.

    What is PSR-7?

    PSR-7 is a standard defined by the PHP-FIG. It don’t like to repeat the standard documents in my blog post. The idea is to give you some real world examples how you can use PSR-7 in your PHP projects. If you investigate the standard you can determine that it doesn’t contain any implementation.

    Like the other standard of the FIG it only defines PHP interfaces as contracts. The concrete title of the standard is HTTP message interfaces. And that’s all what it defines. It defines a convenient way to create and consume HTTP messages. A client sends a request and a server processes it. After processing it, the server sends a response back to the client.

    Nothing new? Yes, that is how any PHP server application works. But without PSR-7 every big framework or application implements it’s own way to handle requests and responses. Our dream is that we can share HTTP related source code between applications. The main goal is: interoperability.

    History

    Before any PSR standard we had standalone PHP applications. There were some basic PHP libraries to use. Most of the code was incompatible. With PSR-0 we got an autoload standard to connect all the PHP libraries.

    The PSR-7 is a standard to connect an application on HTTP level. The first draft for PSR-7 was submitted by Michael Dowling in 2014. Michael is the creator of Guzzle, a famous PHP HTTP client library. He submitted his idea. After that the group discussed the idea behind a standardized way to communicate with messages. Matthew Weier O’Phinney (the man behind Zend Framework) took over the work of Michael.

    In May 2015 we had an officially accepted PSR-7. After that the most big frameworks adopted the standard or created some bridge/adapter code to utilize the new standard.

    Overview

    Thanks to Beau Simensen


    The image gives us an overview about the PSR-7 interfaces. The blue color represents the inheritance. The message interface is the main interface of the standard. The request of a client and the response of the server inherit the message interface. That’s not surprising, because the message utilizes the HTTP message itself. The red dotted lines clarify the usage of other parts.

    Request-flow with PSR-7

    The main flow with PSR-7 is:

    1. Client creates an URI
    2. Client creates a request
    3. Client sends the request to server
    4. Server parses incoming request
    5. Server creates a response
    6. Server sends response to client
    7. Client receives the response

    This was the first part of the blog series. The next part will look more closely at the request and the URI.