Tag: api

  • Create a GraphQL Mesh from scratch

    Create a GraphQL Mesh from scratch

    GraphQL Mesh is a powerful tool that allows you to use GraphQL query language, regardless of the source’s original format. It can be used with REST APIs, gRPC, SOAP, and more. In this blog post, we’ll explore how to set up and use GraphQL Mesh in your projects.

    Warning: The article requires a bit of NodeJS knowledge. The examples are tested with NodeJS 16.
    We also define a environment variable MAGENTO_ACCESS_TOKEN containing a a Magento Bearer Token. to access the API. If you don’t have a Magento system available the then replace it with another GraphQL endpoint and modify the examples here.

    Setting Up GraphQL Mesh

    To get started with GraphQL Mesh, you’ll first need to install the necessary dependencies. You can do this by adding the following to your package.json file:

    {
      "dependencies": {
        "@graphql-mesh/cli": "^0.82.35",
        "@graphql-mesh/graphql": "^0.22.7",
        "@graphql-mesh/openapi": "^0.24.13",
        "@graphql-mesh/transform-filter-schema": "^0.14.115",
        "@graphql-mesh/transform-prefix": "^0.93.1",
        "graphql": "^16.6.0"
      }
    }
    

    Once you’ve added these dependencies, you can install them using your package manager of choice.

    Install the dependencies with yarn or npm. We use yarn here:

    yarn install

    Writing a GraphQL Query

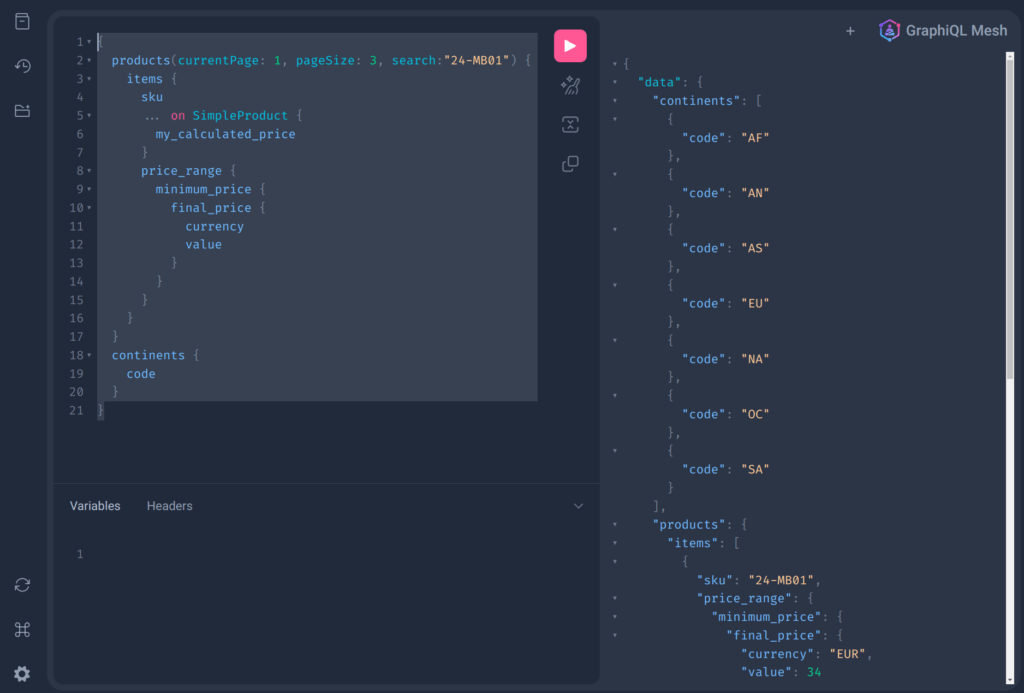
    With GraphQL Mesh, you can write queries that fetch data from multiple sources. Here’s an example of a GraphQL query that fetches product data and station data (yes, it’s a wild mix of APIs):

    {
      products(currentPage: 1, pageSize: 3, search:"24-MB01") {
        items {
          sku
          ... on SimpleProduct {
            my_calculated_price
          }
          price_range {
            minimum_price {
              final_price {
                currency
                value
              }
            }        
          }
        }
      }
      continents {
        code
      }
    }

    In this example, products and continents are two different queries that fetch data from different sources. The products query fetches product data, while continents fetches geographical information. Both queries are fired agains two different backend systems and APIs. As a developer you don’t see the backend systems. You see only one unified APIs. That’s one of the big advantages.

    Creating Resolvers

    Resolvers in GraphQL are functions that resolve data for your queries. In GraphQL Mesh, you can create resolvers that fetch data from your sources and return it in the format you need. Here’s an example of a resolver for the SimpleProduct type:

    import { Resolvers } from './.mesh'
    
    const resolvers: Resolvers = {
        SimpleProduct: {
            my_calculated_price: {
                selectionSet: /* GraphQL */`
                {
                    id,
                    price_range {
                        minimum_price {
                            final_price {
                                value
                            }
                        }        
                    }
                }
                `,
                resolve: async (root, _args, context, info) => {
                    console.log(root)
                    return (99.98 + root.price_range.minimum_price.final_price.value).toFixed(4)
                }
            }
        }
    }
    
    export default resolvers

    In this example, the my_calculated_price resolver fetches the price of a product and adds a fixed amount to it as example of a price calculation. We added a console.log here. If you query the products with the my_calculated_price field then you should see the value in your running console.

    Configuring GraphQL Mesh

    Finally, you’ll need to configure GraphQL Mesh to use your sources and resolvers. You can do this in the .meshrc.yaml file:

    serve:
      port: 5000
      browser: false
      playground: true
    sources:
      - name: Magento
        handler:
          graphql:
            endpoint: https://magento-demo.example.com/graphql
            operationHeaders:
              Authorization: Bearer {env.MAGENTO_ACCESS_TOKEN}
    
      - name: Countries
        handler:
          graphql:
            endpoint: https://countries.trevorblades.com
    
    transforms:
      - filterSchema:
          mode: wrap
          filters:
            - Query.!giftCardAccount
    
    additionalTypeDefs: |
      extend type SimpleProduct {
    
    
        sap_price: Float
      }
    
    
    additionalResolvers:
        - "./resolvers"

    In this configuration file, we’ve defined two sources: Magento and Countries. Each source has a GraphQL endpoint that GraphQL Mesh will fetch data from. We’ve also defined a transform that filters out the giftCardAccount query from the schema.

    The additionalTypeDefs section allows us to extend existing types with our own fields. In this case, we’re extending the SimpleProduct type with a my_calculated_price field.

    The additionalResolvers section is where we specify the path to our resolvers file.

    The library can do a lot of more stuff. One important feature is filtering the schema. Sometimes you don’t want publish everything in your schema. We then use a filter transformer to strip some meta data (giftCardAccount query in our example). It’s then not possible anymore to fetch this entities.

    You can find a brief documentation here: https://the-guild.dev/graphql/mesh

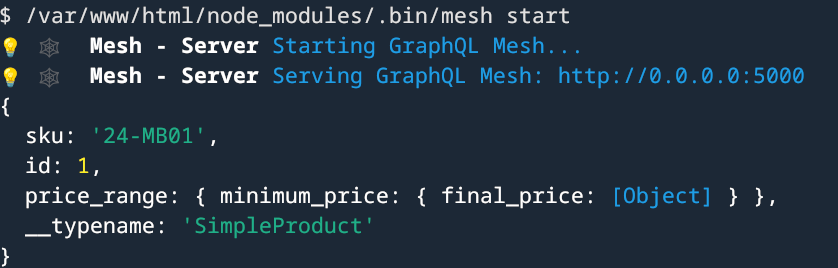
    Now you can try to run the mesh:

    yarn mesh build
    yarn mesh start
    // or dev mode -> yarn mesh dev

    This should build and run the mesh.

    If you open the printed url in your browser you should see a nice API playground.

    Conclusion

    GraphQL Mesh is a powerful tool that allows you to use GraphQL with any source, regardless of its original format. By setting up your dependencies, writing your queries, creating your resolvers, and configuring GraphQL Mesh, you can start fetching data from multiple sources with ease.

    Remember, the examples provided in this blog post are just that – examples. Your actual implementation may vary based on your specific needs and the sources you’re working with. However, these examples should provide a solid foundation for you to start working with GraphQL Mesh. Happy coding!

  • Get PDF files by Magento Webapi

    Get PDF files by Magento Webapi

    Magento 2 comes with a modern REST interface. One of the advantages of the REST interface is that it can handle multiple response types. A client can request data from the server with a list of acceptable response formats. Out of the box Magento 2 supports two types. It comes with JSON and XML support.

    You can test it with a simple call to your local store.

    curl -X GET --header "Accept: application/json" "http://<store-baseurl>/rest/default/V1/categories"

    If you omit the accept header the server will return JSON as default. Let’s change the accept header to “application/json”.

    curl -X GET --header "Accept: application/xml" "http://<store-baseurl>/rest/default/V1/categories"

    Now you should see a well formed XML document:

    Extend the list of acceptable mime types

    Magento 2 can handle JSON and XML. What if we want to add an alternative return format? The bad news… it cannot handle it by default. The good news… You can add the support by yourself.
    The response is generated internally by response renderers which must implement the RendererInterface.

    interface RendererInterface
    {
        /**
         * Render content in a certain format.
         *
         * @param object|array|int|string|bool|float|null $data
         * @return string
         */
        public function render($data);
    
        /**
         * Get MIME type generated by renderer.
         *
         * @return string
         */
        public function getMimeType();
    }
    

    The interface is really simple. A mime type must be defined. In our example we intend to handle the mime type “application/pdf”. The main idea of this demo is to return an existing invoice directly as printable PDF document instead of the JSON or XML data.

    ## Request Workflow

    A request by a browser or a HTTP client (i.e. curl) is sent to the server. The request is dispatched by a special REST FrontController. The FrontController executes some business logic and passes the generated output data to a response object. The response object is generated by a RendererFactory which creates a renderer object based on the mime types of the request accept header.

    Webapi Response Rendering Overview

    If we want to add our own renderer for a specific mime type we can use the Magento 2 Dependency Injection for that. The RendererFactory gets a list of available renderers via di.xml. The next thing we need to do is to create an own module and to add the di.xml in our module with following content:

    <?xml version="1.0"?>
    <config xmlns:xsi="http://www.w3.org/2001/XMLSchema-instance"
            xsi:noNamespaceSchemaLocation="urn:magento:framework:ObjectManager/etc/config.xsd">
    
        <type name="Magento\Framework\Webapi\Rest\Response\RendererFactory">
            <arguments>
                <argument name="renders" xsi:type="array">
                    <item name="application_pdf" xsi:type="array">
                        <item name="type" xsi:type="string">application/pdf</item>
                        <item name="model" xsi:type="string">\N98\WebapiRestPdf\Response\Renderer\PdfRenderer</item>
                    </item>
                </argument>
            </arguments>
        </type>
    
    </config>
    

    Now our response renderer must be created. It must implement the renderer interface. Firstly we add the getMimeType method and let them return the value “application/pdf”. Secondly we implement the render method which returns the PDF data. In our example we only support the REST URL “/V1/invoices”.

    <?php
    namespace N98\WebapiRestPdf\Response\Renderer;
    
    use Magento\Framework\Webapi\Exception;
    use Magento\Framework\Webapi\Rest\Request;
    use Magento\Framework\Webapi\Rest\Response\RendererInterface;
    use Magento\Sales\Api\InvoiceRepositoryInterface;
    use N98\WebapiRestPdf\Service\InvoicePdfGeneratorService;
    
    class PdfRenderer implements RendererInterface
    {
        /**
         * @var \Magento\Framework\Webapi\Rest\Request
         */
        private $request;
    
        /**
         * @var \N98\WebapiRestPdf\Service\InvoicePdfGeneratorService
         */
        private $invoicePdfGeneratorService;
    
        /**
         * @var \Magento\Sales\Api\InvoiceRepositoryInterface
         */
        private $invoiceRepository;
    
        /**
         * Pdf constructor.
         * @param \Magento\Framework\Webapi\Rest\Request $request
         * @param \N98\WebapiRestPdf\Service\InvoicePdfGeneratorService $invoicePdfGeneratorService
         * @param \Magento\Sales\Api\InvoiceRepositoryInterface $invoiceRepository
         */
        public function __construct(
            Request $request,
            InvoicePdfGeneratorService $invoicePdfGeneratorService,
            InvoiceRepositoryInterface $invoiceRepository
        ) {
            $this->request = $request;
            $this->invoicePdfGeneratorService = $invoicePdfGeneratorService;
            $this->invoiceRepository = $invoiceRepository;
        }
    
        /**
         * Render content in a certain format.
         *
         * @param object|array|int|string|bool|float|null $data
         * @return string
         * @throws \Magento\Framework\Webapi\Exception
         */
        public function render($data)
        {
            if (!strstr($this->request->getPathInfo(), '/V1/invoices')) {
                throw new Exception(__('PDF rendering is not supported for this URI'));
            }
    
            if (isset($data['entity_id'])) {
                $invoice = $this->invoiceRepository->get($data['entity_id']);
                $pdf = $this->invoicePdfGeneratorService->execute($invoice);
    
                return $pdf->render();
            }
         
            return null;
        }
    
        /**
         * Get MIME type generated by renderer.
         *
         * @return string
         */
        public function getMimeType()
        {
            return 'application/pdf';
        }
    }
    

    For a better software architecture we place the PDF generation code in an own InvoicePdfGeneratorService class.

    <?php
    namespace N98\WebapiRestPdf\Service;
    
    use Magento\Sales\Api\Data\InvoiceInterface;
    
    class InvoicePdfGeneratorService
    {
        /**
         * @var \Magento\Sales\Model\Order\Pdf\Invoice
         */
        private $invoicePdf;
    
        /**
         * PdfGeneratorService constructor.
         * @param \Magento\Sales\Model\Order\Pdf\Invoice $invoicePdf
         */
        public function __construct(\Magento\Sales\Model\Order\Pdf\Invoice $invoicePdf)
        {
            $this->invoicePdf = $invoicePdf;
        }
    
        /**
         * @param \Magento\Sales\Api\Data\InvoiceInterface $invoice
         * @return \Zend_Pdf
         */
        public function execute(InvoiceInterface $invoice)
        {
            return $this->invoicePdf->getPdf([$invoice]);
        }
    }
    

    That’s all we need to code. As you can see Magento 2 is very extendable. If you have ideas for additional formats, create your own renderer.

    Testing

    Before we start a test of the new functionality, we need an invoice in the database. Simply create a new order in your shop and create an invoice for it in the Magento admin.

    To test the new renderer we can use CURL again. To fetch an invoice you need API credentials. The simplest way to do that, is to get an “Access Token”.

    Have a look in the documentation to see how you can obtain an access token: http://devdocs.magento.com/guides/v2.1/get-started/authentication/gs-authentication-token.html

    On my local machine this CURL command looks like this:

    curl -o invoice.pdf -X GET \
    --header "Accept: application/pdf" \
    --header "Authorization: Bearer 0b4sdr02nis73md8qsg3y3b6uk4hi5k4" \
    "http://magento.dev/rest/default/V1/invoices/1"

    This command calls the Magento Shop, which should now return the content of a PDF file. The PDF content is written to the file “invoice.pdf”.

    My PDF looks like this:

    Great! We can now get PDF invoices by the REST API!

    Conclusion

    Magento 2 can be extended in an easy way. If you like to play a little bit with the code of this blog post, checkout our demo module on Github.

    https://github.com/netz98/N98_WebapiRestPdf

  • Think outside the box: Magento 2 as API framework

    Think outside the box: Magento 2 as API framework

    In this article, we will cover the web-API and how to use Magento 2 as a standalone API-framework.

    If the web-API is new to you, I recommend to read the development documentation of it first: Magento 2 API documentation

    Why should I do this?

    Short answer: Because you can!

    Not really, there is no reason why you shouldn’t try it at least and have some fun with it – you might get used to it 😉

    With Magento 2, the whole web-API was rebuild from scratch to compete with state of the art frameworks. Together with the well working dependency injection approach, it absolutely makes sense to take a deeper look at it.

    Also, one big advantage of Magento’s implementation of the API is the easy wiring between the request-routing and the executed code that handles the request.

    Compared to Symfony, for example, the creation of new endpoints is easier and more intuitive.

    In the simplest possible case, the definition of a endpoint only contains 6 lines of code:

    <route url="/V1/modules" method="GET">
         <service class="Magento\Backend\Service\V1\ModuleServiceInterface" method="getModules"/>
         <resources>
             <resource ref="Magento_Backend::admin"/>
         </resources>
    </route>

    Aside from the easy definition of a new API endpoint, you can also use Magento’s build-in features such as ACL resources for access management, plugins/interceptors, automatically generated factories and proxies.

    You see, beside the basic shop functionality you also have a well designed toolset to create APIs at your fingertips, no matter of the size or complexity of your project.

    Challenge accepted

    So, what do we need to modify the default Magento installation in order to get this working?

    In fact, it isn’t as much as you might think. We only need to hide the Magento storefront to the public and that’s it (more or less).

    For sure, you also could hide the administration backend and the API endpoints, that comes along with Magento by default, but in our case we are absolutely fine with them. We keep them for now, because of we will need them later.

    Hide the shop

    For hiding the shop, there is a wide range of multiple options that starts with modifying the webserver’s request-resolving and ends with rewriting the entire routing component of the Magento core.

    In our case, we did something in between and created a module with a very low footprint to achieve this.

    By installing thins module, all storefront requests will be blocked except the REST, Swagger and the administration backend related ones.

    If you want to allow more pages to be accessible, you can simply modify the whitelist-patterns using the system configuration settings.

    To hide the default frontend of Magento, simply install the following module according to it’s installation guide: netz98/headless-guillotine

    Example Usage

    After installing the module, you will find a new system-configuration setting:

    This will rise an exception in case a blocked route is requested. The printed error will do the trick while you are testing, but I would recommend to add a configuration for handling the exception in a proper way later on – so the customer won’t get a blank page with cryptic informations in case he directly accesses the page  😉

    Summary

    You see, with a very view steps you can use Magento 2 as a API framework, that implements state of the art techniques and supports the modern web-development.

    The module provided by netz98 makes it really simple to quickly hide your storefront and to start your backend development.

    Final Words

    Have you implemented similar things or have you tested the setup as described in this post?

    Let me know about it in the comments below, I’d really like to chat with you about your approaches and ideas – your feedback is highly appreciated!